- 14 Jul 2022
- 8 Minutes to read
- Print
- DarkLight
Part 5: Embedding the Call Panel
- Updated on 14 Jul 2022
- 8 Minutes to read
- Print
- DarkLight
Introduction
In the previous tutorial, you have created an app and have authenticated Comm100 Agent in Vincall. Then you can log in to the Vincall system through Agent mapping. In this tutorial, You will learn how to add Vincall Call Panel into Comm100 Agent Console Nav Bar.

Step-by-Step Instructions
We use the Comm100 app to extend the nav bar UI and interact with the Agent Console by referencing the Comm100 Client SDK.
The tutorial covers the following tasks:
Adding New Tab in Nav Bar
Add the following definition to the manifest.json file (/src/assets/manifest.json) in vincall-app:
  "agentConsole": {
    "widgets": {
      "navBar": {
        "id": "vincall-nav-bar",
        "label": "Vin Call",
        "url": "./callPanel.html"
      }
    }
  },
- id:
vincall-nav-bar. We just have to make sure it's unique in the app. - label:
Vin Call. Text of the Agent Console Nav Bar. - url:
./callPanel.html. This page provided by the app, loads this page when switching to the extended tab.
- Here we will not repeat the entire front-end construction process, but only explain the key code of main.tsx. The position of this file is placed to src/pages/phone/main.tsx.
import React, { useEffect, useRef } from "react";
import { render } from "react-dom";
import { callPanelUrl } from "src/config";
import { registerEvents } from "./eventHandle";

const App = () => {
  const iframeRef = useRef<HTMLIFrameElement>();

  useEffect(() => {
    registerEvents(iframeRef.current?.contentWindow);
  }, []);

  return (
    <iframe
      ref={iframeRef as any}
      src={`${callPanelUrl}${window.location.search}`}
      width="100%"
      height="100%"
      frameBorder={0}
      allow="camera *; microphone *"
    />
  );
};

render(<App />, document.getElementById("main"));
In this file, we reference call panel page through the iframe, the call panel page is provided by vincall-portal.
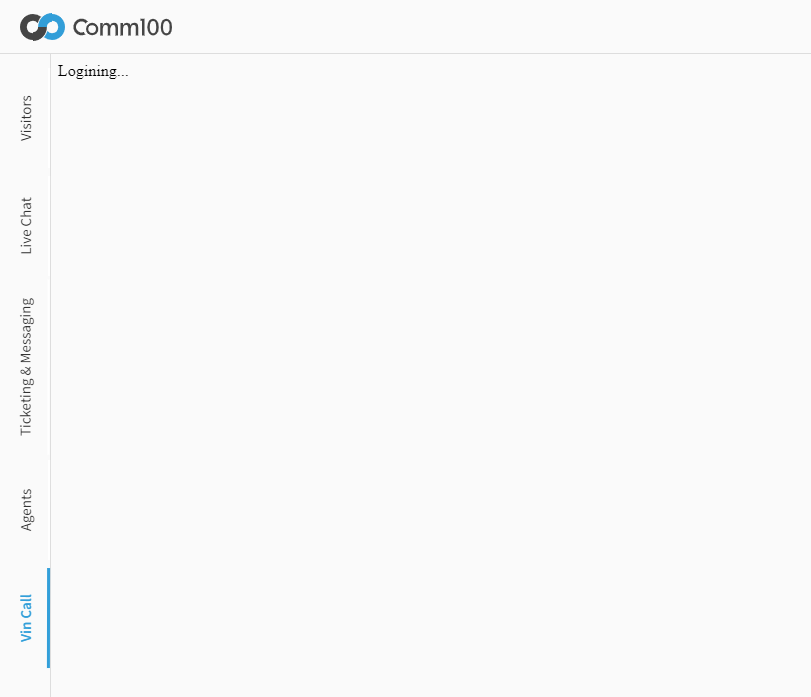
- Create new file /public/oauth/login.html in vincall-portal. We can put the basic content in it. In next section we will handle the authenticate login in login.html. Put the following code into login.html, then open the agent console, and you'll see the new tab page.
<!DOCTYPE html>
<html lang="en">
  <head>
    <meta charset="utf-8" />
    <link rel="icon" href="/vincall.svg" />
    <meta name="viewport" content="width=device-width, initial-scale=1" />
    <meta name="description" content="Vincall manage system" />
    <title>Vin Call</title>
  </head>
  <body>
    <div>Logining...</div>
    <script>
      // Handle authenticate login
    </script>
  </body>
</html>

Authenticating with Comm100 Agent
In this section, we will get through the user authentication so that after logging in the Comm100 system, you can access the resources of the embedded Vincall system without any user login of the Vincall system.
- Adding an OAuth Client
- Implementing an OAuth authorization flow to get the access token
- Getting current agent info using access token
- Finding the Vincall user corresponding to this Comm100 agent
- Setting login status and complete login
- Redirecting to the original target resource
Adding an OAuth Client
You must add an OAuth Client in Comm100 Control Panel to generate OAuth credentials for Vincall. Depending on the OAuth flow, the OAuth client might not have access to all Comm100 accounts.
Sign in as an admin to Comm100.
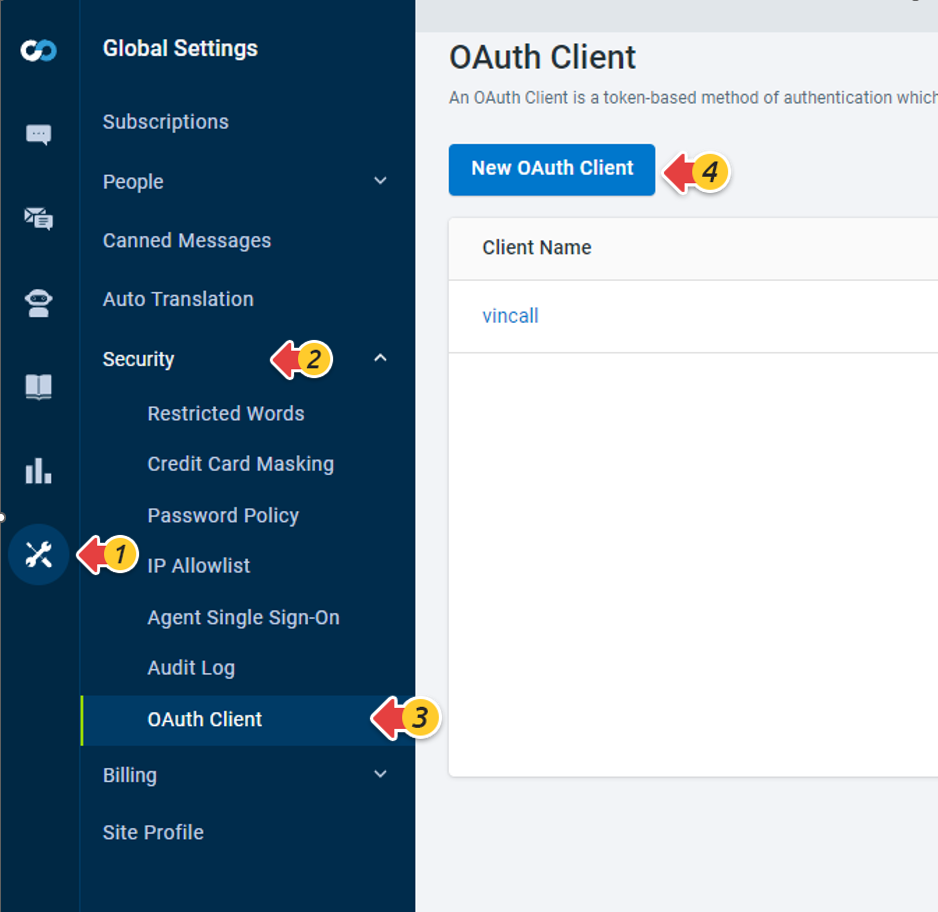
In the Dashboard, go to Global Settings >> Security >> OAuth Client >> New OAuth Client.

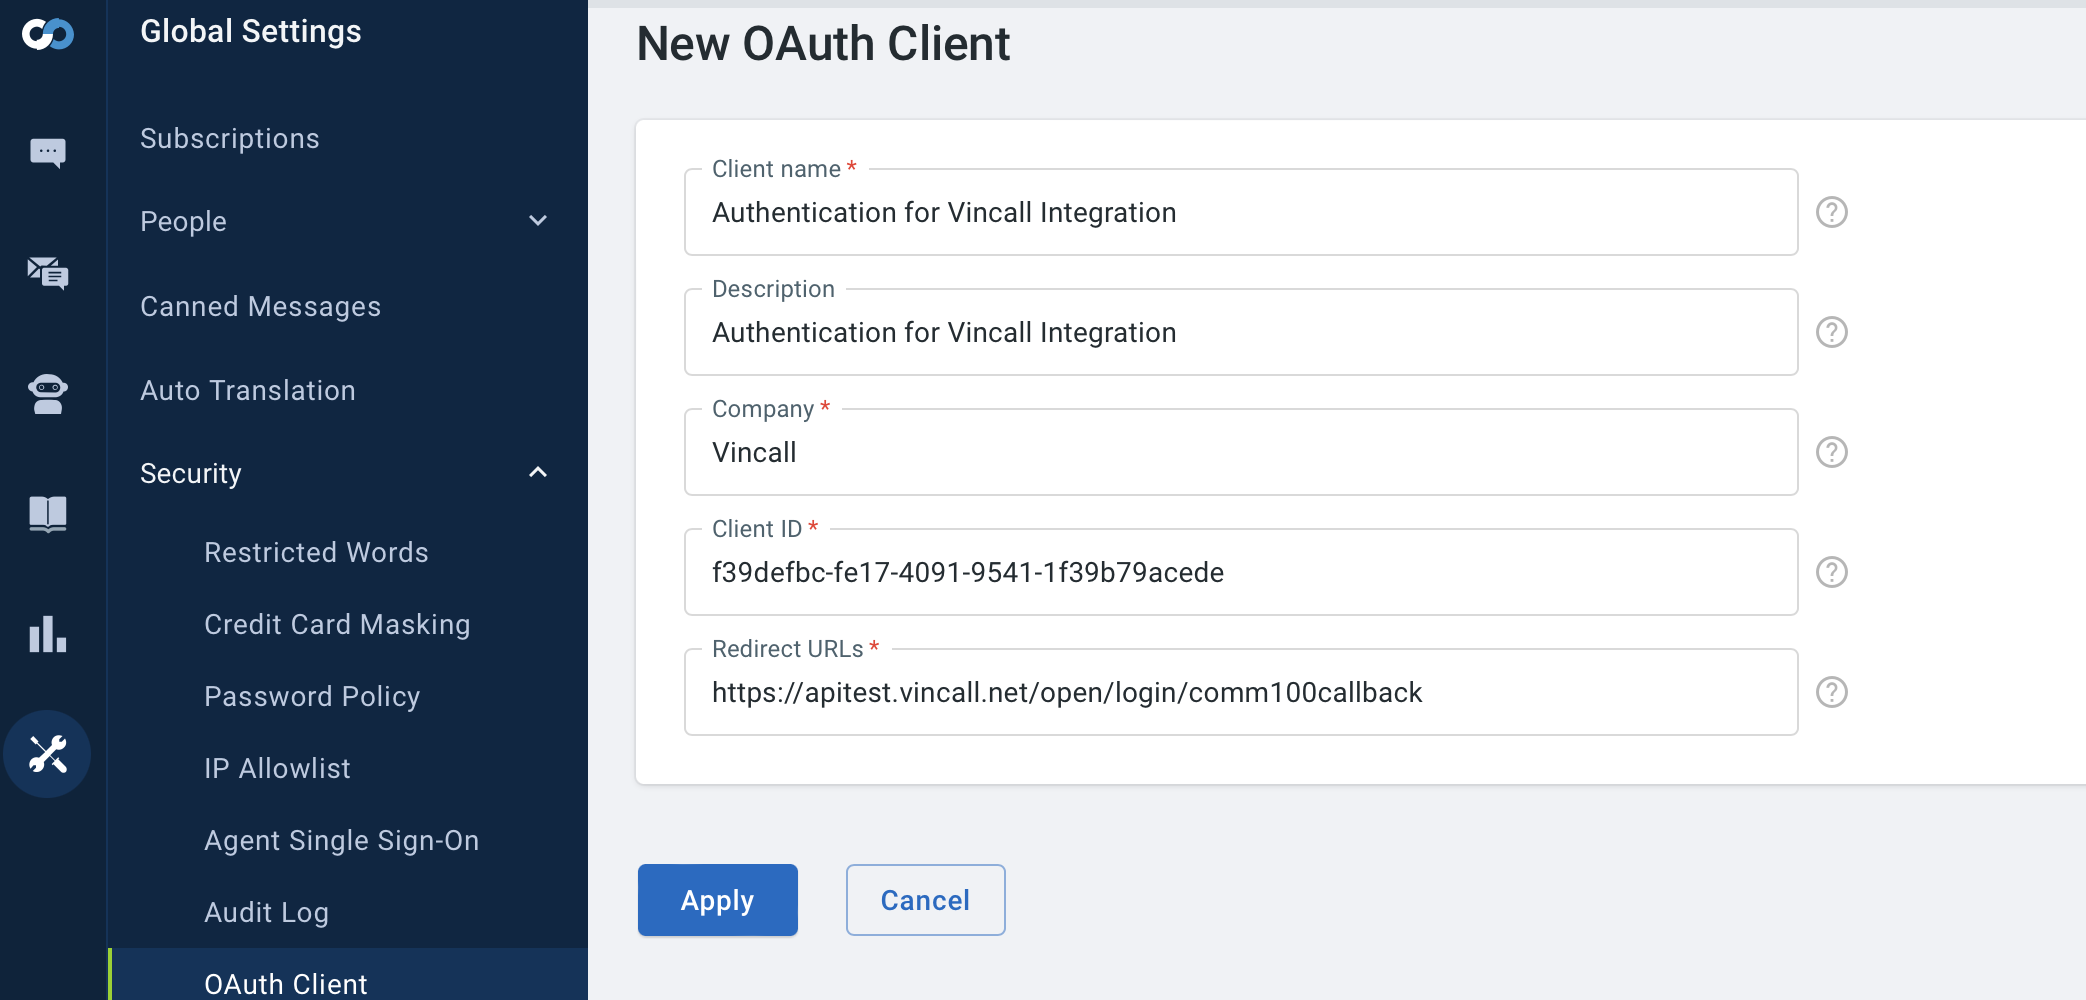
Complete the following fields:

Client name: Your OAuth Client name displayed to users when asked to grant access to Vincall or when viewing all apps that have been granted access.Description: A short description of your OAuth Client for user who are considering granting access to Vincall.Company: This name is displayed when users are asked to grant access to Vincall. The name helps users understand to whom they're granting accessClient ID: This will be used as the identifier of your OAuth Client in code.Redirect URLs: This is the URL of Vincall to which Comm100 redirects user with a grant token (code) after successful authentication. The URL should be absolute and not relative, and starts with https. You can set up several redirect URLs using commas.
Click Apply and the OAuth Client will be successfully created. Store ClientId and ClientSecrect. They will be used later.
Implementing an OAuth authorization flow to get the access token
On the page that needs to authenticate the Comm100 agent, check the login status. If not, redirect to OAuth to complete OAuth authorization flow and obtain the access token.
Comm100 supports several OAuth flows. Here we will introduce the authorization code grant flow, produces an authorization code after the user grants Vincall access to their account. Vincall can then exchange the authorization code for an access token to use in API requests.
To implement the authorization code grant flow, you need to add the following functionality to Vincall:
Send the user to the Comm100 authorization page
Vincall has to send the user to the Comm100 authorization page. The page asks the user to authorize Vincall to access Comm100.
So in the login.html file(/public/oauth/login.html) of the vincall-portal project, we need to redirect to the Comm100 authorization page.
<body>
  <div>Logining...</div>
  <script src="./util.js"></script>
  <script>
    // Handle authenticate login
    fetch(`${__server_url}/api/sso/comm100connectinfo`)
      .then(function (response) {
        return response.json();
      })
      .then(function (data) {
        var client_id = data.clientId,
          search = getSearch(),
          returnuri =
            search.returnuri ||
            location.protocol + "//" + location.host + "/oauth/logoncallpanel",
          redirect_url = encodeURIComponent(
            `${__server_url}/api/sso/callback?domain=${search.domain}&siteId=${search.siteId}&returnuri=${returnuri}`
          ),
          url = `${
            search.domain
          }/oauth/authorize?response_type=code&client_id=${client_id}&siteId=${
            search.siteId
          }&scope=${encodeURIComponent(
            "openid offline_access"
          )}&redirect_uri=${redirect_url}`;
        location.href = url;
      });
  </script>
</body>
Get an access token from Comm100 OAuth
If the user decided to authorize Vincall, the URL contains an authorization code. so we need to provide a callback interface to handle the user's authorization decision.
Create SsoCallModel file(/vincall.service/vincall.service/Models/SsoCallModel.cs) in the project Vincall-Service to receive parameters
public class SsoCallModel
{
    public string Code { get; set; }
    public string AgentId { get; set; }
    public string SiteId { get; set; }
    public string Domain { get; set; }
    public string Scope { get; set; }
    public string Token { get; internal set; }
    public string redirect_uri { get; set; }
}
If Vincall received an authorization code from Comm100 OAuth in response to the user granting access, Vincall can call Comm100 OAuth to get an access token. And then, we can get current agent info from access token.
Define an interface in the IComm100OauthClient.cs file(/vincall.service/vincall.service/WebApiServices/IComm100OauthClient.cs) of the Vincall-Service project to get token.
[HttpPost("/oauth/token")]
[HostFilterAttribute]
Task<TokenResult> QueryAccessTokenAsync([PathQuery]string siteId, [FormContent]string code, [FormContent]string client_id, [FormContent]string client_secret, [FormContent]string redirect_uri, [FormContent]string grant_type = "authorization_code");
Define the callback interface in the SSoController.cs file(/vincall.service/vincall.service/Controllers/SSoController.cs) of the Vincall-Service project.
[HttpGet]
public async Task<IActionResult> CallbackAsync([FromQuery]SsoCallModel model)
{
    var errMsg = string.Empty;
    var oauthInfo = await _settingService.GetAsync("comm100");
    if(string.IsNullOrEmpty(oauthInfo?.client_id))
    {
        return new BadRequestResult();
    }
    if (string.IsNullOrEmpty(model?.Code))
    {
        errMsg = "invalid authorizatoin code";
    }
    else
    {
        try
        {
            _hostProvider.Host = model.Domain;
            var info = await GetTokenAsync(model.Code, model.SiteId);
                var user = await _services.ReadSingleAsync<User>(x => x.Account == userComm100.Account);
                if (user == null)
                {
                    errMsg=$"No  user for account: {userComm100.Account}";
                }
                await WriteCookieAsync(HttpContext, user);
                var uriRedirect = BuildUrl(oauthInfo.redirect_uri, new Dictionary<string, StringValues> {
                    {"userId",user.Id.ToString() },
                    {"role", "user" },
                    {"userAccount",user.Account },
                    {"userName",user.UserName },
                    {"success","true" },
                });
                return Redirect(uriRedirect.ToString());
        }
        catch(Exception ex)
        {
            errMsg = $"comm100 oauth code :{model.Code},{ex.Message}";
            _logger.LogError(ex, $"comm100 oauth code :{model.Code},{ex.Message}");
        }
    }
    var uri = BuildUrl(oauthInfo.redirect_uri, new Dictionary<string, StringValues> {
                    {"success","false" },
                    {"errMsg", errMsg },
                });
    return Redirect(uri?.ToString());
}
Getting current agent info using access token
Define an interface in the IComm100OauthClient.cs file(/vincall.service/vincall.service/WebApiServices/IComm100OauthClient.cs) of the Vincall-Service project to obtain agent information.
[HttpGet("/oauth/userinfo")]
[HostFilterAttribute]
ITask<Comm100Info> GetProfileInfoAsync([Header("Authorization")]string token,[PathQuery]string siteId);
Define a interface in the SSoController.cs file(/vincall.service/vincall.service/Controllers/SSoController.cs) of the Vincall-Service project to get current agent info.
private async Task<Comm100Info> GetTokenAsync(string code,string siteId)
{
    var info = await _settingService.GetAsync("comm100");
    var tokenResult = await _comm100OauthClient.QueryAccessTokenAsync(siteId, code, info.client_id, info.client_secret, info.redirect_uri,info.grant_type);
    return await _comm100OauthClient.GetProfileInfoAsync($"{tokenResult.token_type} {tokenResult.access_token}", siteId);
}
Finding the Vincall user corresponding to this Comm100 agent
Each Comm100 agent should have a user corresponding to it in Vincall. We can find the Vincall user corresponding to this Comm100 agent.
Define a interface in the SSoController.cs file(/vincall.service/vincall.service/Controllers/SSoController.cs) of the Vincall-Service project to get Comm100 agent info.
var userComm100 = await _services.ReadSingleAsync<UserComm100>(x => x.SiteId == info.SiteId && x.ExternId == info.AgentId);
Setting login status and complete login
Define a interface in the VincallTokenController.cs file(/vincall.service/vincall.service/Controllers/VincallTokenController.cs) of the Vincall-Service project.
public static async Task<VincallToken> WriteCookieAsync(HttpContext context, User user)
{
    var userId = user.Id.ToString();
    var role = user.IsAdmin ? "admin" : "user";
    var userName = user.UserName;
    var account = user.Account;
    var isu = new IdentityServerUser("vincall")
    {
        IdentityProvider = IdentityServerConstants.LocalIdentityProvider,
        AuthenticationTime = DateTime.UtcNow
    };
    isu.AuthenticationMethods.Add(OidcConstants.AuthenticationMethods.Password);
    isu.AdditionalClaims.Add(new Claim(ClaimTypes.NameIdentifier, userId));
    isu.AdditionalClaims.Add(new Claim(ClaimTypes.Role, role));
    isu.AdditionalClaims.Add(new Claim(ClaimTypes.Name, userName));
    isu.AdditionalClaims.Add(new Claim("UserAccount", account));
    await context.SignInAsync(CookieAuthenticationDefaults.AuthenticationScheme, isu.CreatePrincipal());
    var tokenResult = new VincallToken()
    {
        access_token = "test",
        refresh_token = "test",
    };
    tokenResult.userId = userId;
    tokenResult.role = role;
    tokenResult.userName = userName;
    tokenResult.userAccount = account;
    return tokenResult;
}
Redirecting to the original target resource
After setting the login status for Vincall, we can access the original page.
We can redirect it back.
Define a interface in the SSoController.cs file(/vincall.service/vincall.service/Controllers/SSoController.cs) of the Vincall-Service project.
var uriRedirect = BuildUrl(oauthInfo.redirect_uri, new Dictionary<string, StringValues> {
    {"userId",vincallUser.Id.ToString() },
    {"role", "user" },
    {"userAccount",vincallUser.Account },
    {"userName",vincallUser.UserName },
    {"success","true" },
});
return Redirect(uriRedirect.ToString());
Define a callback interface in the SSoController.cs file(/vincall.service/vincall.service/Controllers/SSoController.cs) of the Vincall-Service project s follows:
[HttpGet]
public async Task<IActionResult> CallbackAsync([FromQuery]SsoCallModel model)
{
    var errMsg = string.Empty;
    var oauthInfo = await _settingService.GetAsync("comm100");
    if(string.IsNullOrEmpty(oauthInfo?.client_id))
    {
        return new BadRequestResult();
    }
    if (string.IsNullOrEmpty(model?.Code))
    {
        errMsg = "invalid authorizatoin code";
    }
    else
    {
        try
        {
            _hostProvider.Host = model.Domain;
            var info = await GetTokenAsync(model.Code, model.SiteId);
            //find user
            var userComm100 = await _services.ReadSingleAsync<UserComm100>(x => x.SiteId == info.SiteId && x.ExternId == info.AgentId);
            if (userComm100 == null)
            {
                //create agent
                var vincallUser = await _services.CreateAndSaveAsync<User>(new User
                {
                    UserName = info.AgentId,
                    Account = info.Email ?? "comm100user",
                    IsAdmin = false,
                    Password = Md5Helper.Md5("Aa000000")
                });
                await _services.CreateAndSaveAsync<UserComm100>(new UserComm100
                {
                    Account = vincallUser.Account,
                    Email = info.Email,
                    ExternId = info.AgentId,
                    PartnerId = info.PartnerId,
                    SiteId = info.SiteId,
                });
                await WriteCookieAsync(HttpContext, vincallUser);
                var uriRedirect = BuildUrl(oauthInfo.redirect_uri, new Dictionary<string, StringValues> {
                    {"userId",vincallUser.Id.ToString() },
                    {"role", "user" },
                    {"userAccount",vincallUser.Account },
                    {"userName",vincallUser.UserName },
                    {"success","true" },
                });
                return Redirect(uriRedirect.ToString());
            }
            else
            {
                var user = await _services.ReadSingleAsync<User>(x => x.Account == userComm100.Account);
                if (user == null)
                {
                    errMsg=$"No  user for account: {userComm100.Account}";
                }
                await WriteCookieAsync(HttpContext, user);
                var uriRedirect = BuildUrl(oauthInfo.redirect_uri, new Dictionary<string, StringValues> {
                    {"userId",user.Id.ToString() },
                    {"role", "user" },
                    {"userAccount",user.Account },
                    {"userName",user.UserName },
                    {"success","true" },
                });
                return Redirect(uriRedirect.ToString());
            }


        }
        catch(Exception ex)
        {
            errMsg = $"comm100 oauth code :{model.Code},{ex.Message}";
            _logger.LogError(ex, $"comm100 oauth code :{model.Code},{ex.Message}");
        }
    }
    var uri = BuildUrl(oauthInfo.redirect_uri, new Dictionary<string, StringValues> {
                    {"success","false" },
                    {"errMsg", errMsg },
                });
    return Redirect(uri?.ToString());
}
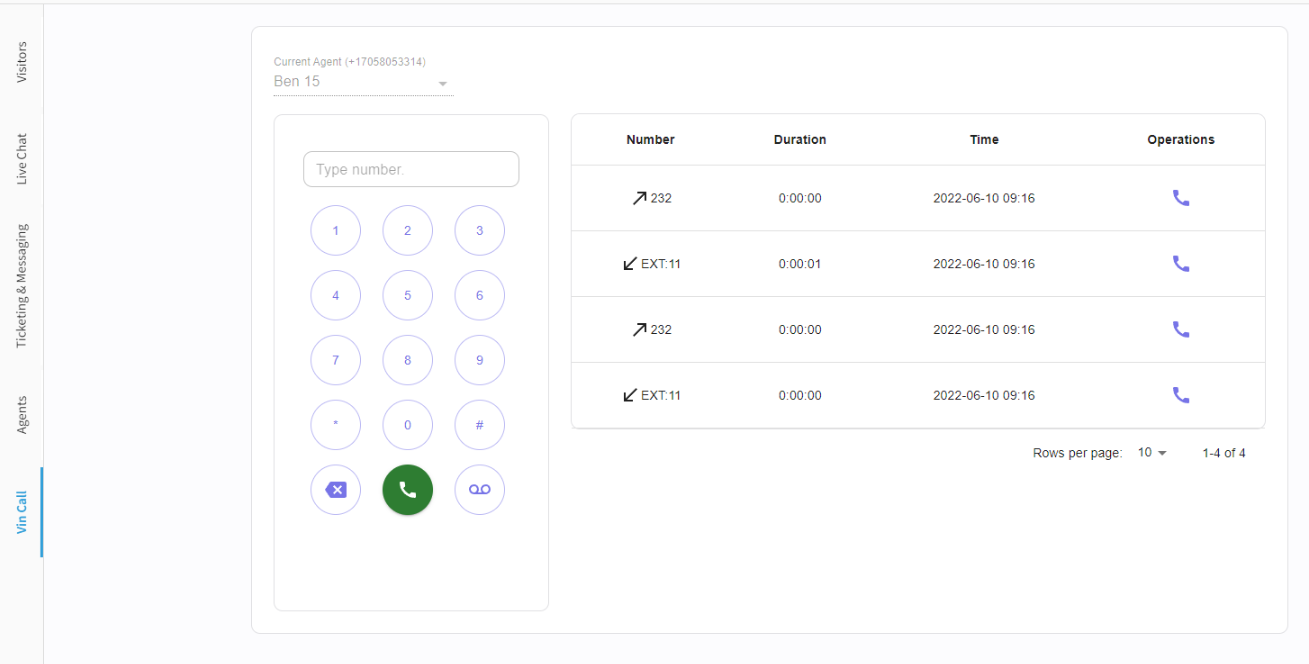
Now, when you visit the Vincall tab in Agent Console, you will see that the tab page will automatically log in to the Vincall system and display the call panel page.
Next Steps
This article has taught you how to add Vincall Call Report into Comm100 Reports, and after setting, you can access the embedded Vincall page in the Comm100 system, so you don't have to jump between the two systems.
Next, you can follow the tutorial of embedding the Dial Pad.

