Introduction
You probably know that Vincall is a basic VoIP system, and Comm100 is an omni-channel customer engagement platform. You can manage the agents, handle calls (from Vincall) and handle chats (from Comm100) with a unified user interface through adding Comm100 Chat into Vincall.
This tutorial guide you that how to add Comm100 Chat into Vincall.
Step-by-Step Instructions
- Adding Chat Tab in Vincall
- Embedding Comm100 Agent Console via Emabeddable SDK
- Enabling JWT Authentication for Comm100
- Connecting to Comm100
Adding Chat Tab in Vincall
In vincall-portal project, refer to the src/Pages/CallPanel/CallPanelPage.tsx file.
Add new tab:
<Tab
  label="Chat"
  iconPosition="end"
  icon={<Comm100StatusIcon status={chatStatus} />}
/>
Add tab content for new tab:
<CTabPanel value={tab} index={1}>
  <AgentConsolePanel />
</CTabPanel>
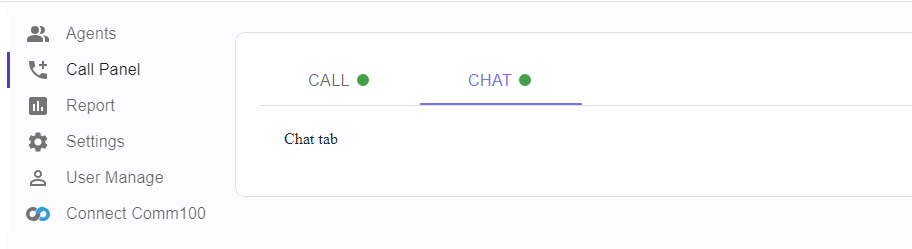
In src/Pages/CallPanel/AgentConsolePanel.tsx file, we can put some simple text in it:
export const AgentConsolePanel = () => {
  const elementId = "comm100-agentconsole";
  return <div id={elementId}>Chat tab</div>;
};
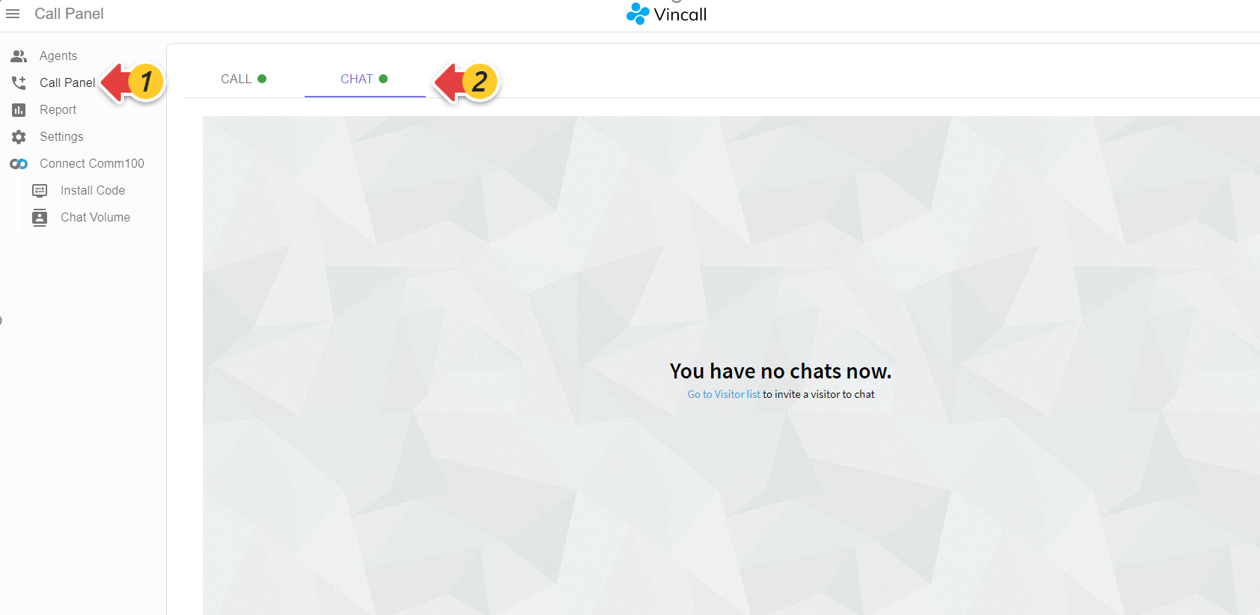
Now visit the call panel page,you can find a new tab in Vincall:
Embedding Comm100 Agent Console via Emabeddable SDK
The frontend codes below are in vincall-portal project.
In order to integrate the Agent Console Chat into Vincall, you need to embed Comm100 Agent Console into the page:
<div id="comm100-agentconsole" style="width:100%; height: 100%"></div>
<script src="https://static.comm100.io/sdk/comm100-embeddable-sdk-v1_0_0.js"></script>
<script>
  var agentconsoleClient = new EmbeddedAgentConsole({
    siteId: "{Your_Site_Id}",
    appId: "{Your_App_Id}",
    container: document.getElementById("comm100-agentconsole"),
  });

  agentconsoleClient.init();
</script>
Let's update the src/Pages/CallPanel/AgentConsolePanel.tsx file to embed the above code in the Chat tab:
export const AgentConsolePanel = () => {
  const elementId = "comm100-agentconsole";
  useEffect(() => {
    install(
      { agentAppId: "{Your_App_Id}", agentConsole: "{Comm100_Domain_Url}" },
      elementId,
      "{Your_Site_Id}"
    );
  }, []);
  return <div id={elementId}>Chat tab</div>;
};

const install = (arg: GlobalSettings, elementId: string, siteId: number) => {
  let s2: any;

  const s = document.createElement("script");
  s.src = arg.agentConsole;
  s.async = true;
  s.onload = () => {
    s2 = document.createElement("script");
    s2.innerHTML = `
    var ac = new EmbeddedAgentConsole({
      appId: "${arg.agentAppId}",
      siteId: ${siteId},
      isShowLogout: false,
      isShowExit: false,
      container: document.getElementById("${elementId}"),
    });
    ac.init().then(client=>{
      window.top.__comm100_client = client;
      window.top.Runtime.init();
    });
    `;
    document.body.appendChild(s2);
  };
  document.body.appendChild(s);
  return () => {
    if (s && s.parentNode) {
      s.parentNode.removeChild(s);
    }
    if (s2 && s2.parentNode) {
      s2.parentNode.removeChild(s2);
    }
  };
};
In vincall-portal project, we get the app ID and Comm100 Domain via the /globalSetting API. So we encapsulate it as a useComm100Snippet hook:
export const useComm100Snippet = (
  elementId: string,
  install: (arg: GlobalSettings, elementId: string, siteId: number) => any
) => {
  const dataProvider = useDataProvider();
  const uninstallRef = useRef<any>(null);
  const siteId = getConnectSiteId();
  useEffect(() => {
    dataProvider
      .httpGet("globalSetting", { type: "installcode" })
      .then(({ data = [] }: { data: any[] }) => {
        const obj = data.reduce((pre, current) => {
          pre[current.key] = current.value;
          return pre;
        }, {}) as GlobalSettings;
        uninstallRef.current = install(obj, elementId, siteId);
      });
    return () => {
      if (uninstallRef.current) {
        uninstallRef.current();
      }
    };
  }, []);
};
Eventually, the AgentConsolePanel.tsx file will look like this:
export const AgentConsolePanel = () => {
  const elementId = "comm100-agentconsole";
  useComm100Snippet(elementId, install);
  return <div id={elementId} style={{ height: "700px" }}></div>;
};
This allows us to embed the Chat page of the Agent Console in Vincall. But the users between Vincall and Comm100 haven't been associated yet, and we can't go directly to the Chat page at this point.
If you click the Chat tab, the system will try to find the account of Comm100 which is mapped with your account of Vincall. If it is found, it will redirect to the Comm100 Agent Console with your account of Comm100 logged in.
So next, let's enable JWT authentication for Comm100 and connect to Comm100.
Enabling JWT Authentication for Comm100
JWT is a token-based identity authentication mechanism, using a specific algorithm to sign and verify the transmitted information. The client stores the private key to sign the information, and the server stores the public key to verify the signature.This tutorial uses the RSA algorithm.
The sequence diagram is as follows:
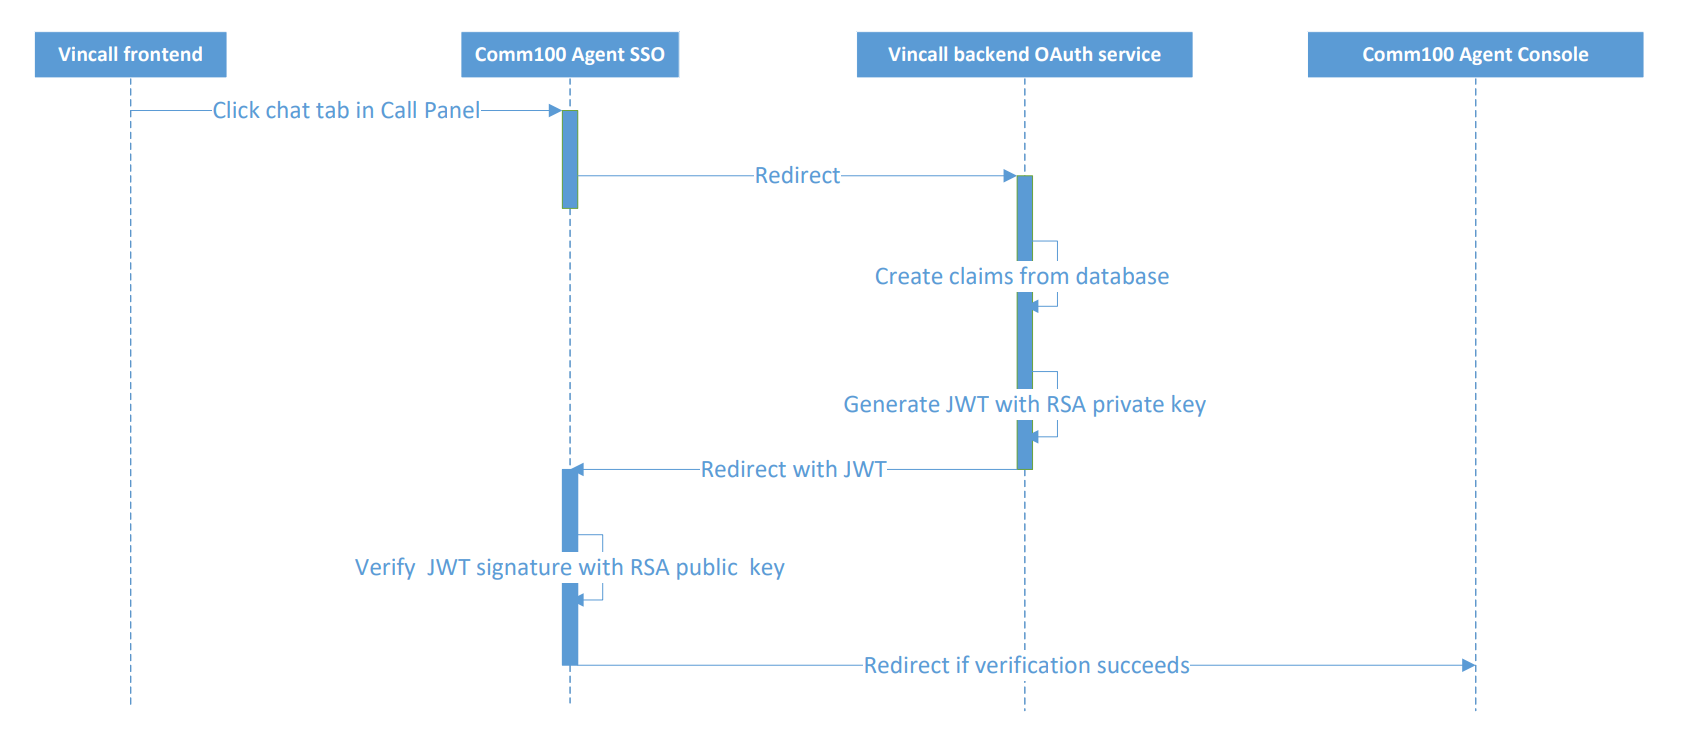
Vincall backend OAuth Service is the backend interface in the Vincall side to accept comm100 redirection and generate JWT.
Comm100 Agent SSO is the SingleSignOn service in Comm100 to enable the user account of other panel to log in Comm100.
Creating RSA public Key and Private key
A pair of RSA PKCS#8 public and private keys are required for signing. You can generate them with the online generation tool.
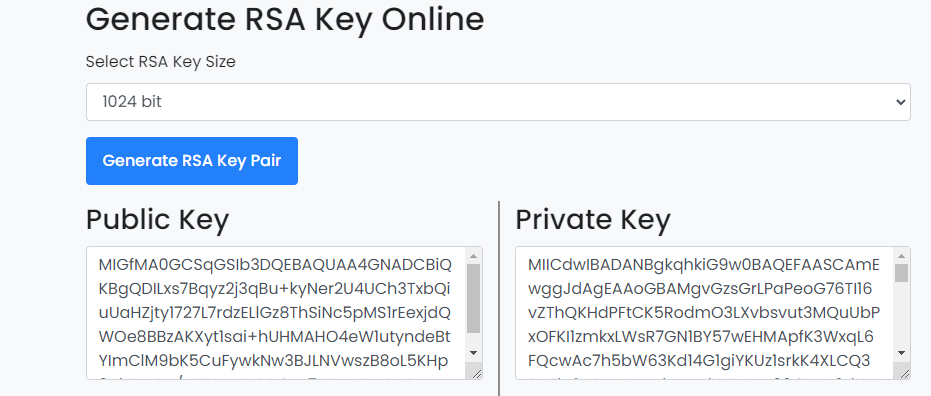
The private key is saved in the vincall side, which is stored in appsettings.json for signing. The public key is saved in the Comm100 side for verification of the signature.
Checking if Comm100 is connected and add Chat tab in frontend
First you should connect Comm100 in the Vincall and then you can see the Chat tab in the Call Panel, more details click Connecting to a Comm100 account. If you click the Chat tab, it will redirect to Comm100 Agent SSO. Then it will redirect to Vincall backend OAuth service to get JWT.
In vincall-portal project, the frontend needs to check if Comm100 is connected and then display the Chat tab.
For example in src/Pages/CallPanel/CallPanelPage.tsx file:
const isComm100Connect = useIsComm100Connect();
Check if Comm100 is connected in src/Helpers/useIsComm100Connect.ts file.
export const useIsComm100Connect = () => {
  const siteId = getConnectSiteId();
  const [isComm100Connect, setIsComm100Connect] = useState < boolean > false;
  const dataProvider = useDataProvider();
  useEffect(() => {
    if (!siteId) {
      return;
    }
    dataProvider
      .httpGet("/connectState", { siteId })
      .then(
        ({
          data,
        }: {
          data: { connected: boolean, server: string, siteId: number },
        }) => {
          setIsComm100Connect(data?.connected);
        }
      );
  }, []);
  return isComm100Connect;
};
Display the Chat tab in src/Pages/CallPanel/CallPanelPage.tsx.
{
  isComm100Connect ? (
    <Tab
      label="Chat"
      iconPosition="end"
      icon={<Comm100StatusIcon status={chatStatus} />}
    />
  ) : null;
}
Redirecting to Vincall backend OAuth service and creating JWT
The Vincall backend oauth service checkout whether the user has been bound in the database. If it has already been bound, jwt will be generated and it will redirect to Comm100 Agent SSO.
The backend codes are in vincall-service project.
- Create Table
UserComm100
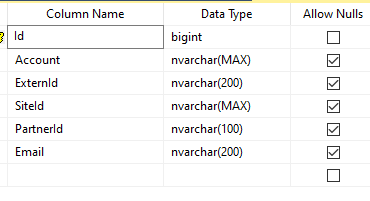
SiteIdrefers to the siteId in Comm100.Accountrefers to the user account of Vincall.Emailrefers to the account to log in Comm100.
- UserAccount is passed from the frontend. Since you have already logged in the Vincall, the user account is stored in the cookie. We can get it from httpContext in dot net core. According to the user account, we can check the table UserComm100 and find the binding relationship. If not found, it will directly throw an exception(vincall.service/vincall.service/Controllers/SSoController).
   var user = HttpContext.User;
   var userAccount = user.Claims.FirstOrDefault(x => x.Type == "UserAccount")?.Value;
   var userComm100 = await _services.ReadSingleAsync<UserComm100>(x=>x.Account==userAccount);
   if(userComm100 == null)
   {
      return BadRequest($"No Bind user for account: {userAccount}");
   }
- Generate claims based on the found userComm100 information. Select the rsa algorithm for signature and finally generate JWT(vincall.service/vincall.service/Controllers/SSoController).
    var privateKey=Configuration["TokenPrivateKey"];// privatekey is stored in appSettings.json,the public Key is stored in the Comm100 agent sso

    //Use RSA to sign the claims
    RSA rsa = RSA.Create();
    rsa.ImportEncryptedPkcs8PrivateKey(Encoding.UTF8.GetBytes("vincall"), Convert.FromBase64String(privateKey), out _);
    var securityKey=new RsaSecurityKey(rsa);
    //create claims
    List<Claim> authClaims = new List<Claim>
    {
       new Claim(JwtClaimTypes.Subject, context.Account??string.Empty),
       new Claim("AgentId", context.ExternId??string.Empty),
       new Claim("partnerId", context.PartnerId??string.Empty),
       new Claim(JwtClaimTypes.Email, context.Email??string.Empty),
       new Claim("siteId", context.SiteId??string.Empty),
       new Claim(ClaimTypes.NameIdentifier,context.Email??string.Empty)
    }

    //sign the claims and create the JWT
    var token=new JwtSecurityToken("auth", "vincall", authClaims, DateTime.UtcNow, DateTime.UtcNow.AddMinutes(10), new SigningCredentials(securityKey, SecurityAlgorithms.RsaSha256));
    var tokenHandler= new JwtSecurityTokenHandler();
    var tokenString = tokenHandler.WriteToken(token);
    return tokenString;
 }
- Redirect to Comm100 Agent SSO with JWT(vincall.service/vincall.service/Controllers/SSoController).
   var uri = BuildUrl(model.redirect_Url, new Dictionary<string, StringValues>{
     {"jwt",token},
     {"relayState",model.RelayState}
   });
   return Redirect(uri.ToString());
- The complete code.
 [HttpGet]

 public async Task<IActionResult> JwtSignInAsync([FromQuery]JwtModel model,string userAccount)
 {
   //Look for the user information for certain userAccount, if can not find,
   var userComm100 = await _services.ReadSingleAsync<UserComm100>(x=>x.Account==userAccount);
   if(userComm100 == null)
   {
      return BadRequest($"No Bind user for account: {userAccount}");
   }
   var token = CreateToken(userComm100);
   var uri = BuildUrl(model.redirect_Url, new Dictionary<string, StringValues>{
     {"jwt",token},
     {"relayState",model.RelayState}
   });
   return Redirect(uri.ToString());
 }


 private string CreateToken(UserComm100 context)
 {
    var privateKey=Configuration["TokenPrivateKey"];// privatekey is stored in appSettings.json,the public Key is stored in the comm100 agent sso

    //Use RSA to sign the claims
    RSA rsa = RSA.Create();
    rsa.ImportEncryptedPkcs8PrivateKey(Encoding.UTF8.GetBytes("vincall"), Convert.FromBase64String(privateKey), out _);
    var securityKey=new RsaSecurityKey(rsa);
    //create claims
    List<Claim> authClaims = new List<Claim>
    {
       new Claim(JwtClaimTypes.Subject, context.Account??string.Empty),
       new Claim("AgentId", context.ExternId??string.Empty),
       new Claim("partnerId", context.PartnerId??string.Empty),
       new Claim(JwtClaimTypes.Email, context.Email??string.Empty),
       new Claim("siteId", context.SiteId??string.Empty),
       new Claim(ClaimTypes.NameIdentifier,context.Email??string.Empty)
    }

    //sign the claims and create the JWT
    var token=new JwtSecurityToken("auth", "vincall", authClaims, DateTime.UtcNow, DateTime.UtcNow.AddMinutes(10), new SigningCredentials(securityKey, SecurityAlgorithms.RsaSha256));
    var tokenHandler= new JwtSecurityTokenHandler();
    var tokenString = tokenHandler.WriteToken(token);
    return tokenString;
 }
Verfiying the signature and Redirecting to the Agent Console frontend
The JWT will be verified in Comm100 Agent SSO. If the verification is successful, it will be redirected to the Comm100 Agent Console interface.
Connecting to Comm100
Connecting to a Comm100 account and Mapping the Agents to Vincall user. Then revisit the call panel's Chat tab, and you can go directly to the Agent Console's Chat page. It's really amazing to have both phone and chat in your Vincall.
Next Steps
Integrating the Chat page of Comm100 into Vincall greatly enhances Vincall's functionality. But what's more, you can also integrate the Control Panel page into Vincall. Please see Adding Install Code and Chat Volume for details.