Introduction
The general management system has its own independent account system, only the legitimate account of the system can log in to its own system, and only the logged-in user can do the next operation.Vincall also has its own account system. Vincall agent users use their own accounts and passwords to log in to the Vincall system. Once the user correctly logs in to the Vincall system, then the user has the right to make and receive calls.
When we embed the Comm100 system page in the Vincall, we are faced with the problem of how to use the currently logged in Vincall account to access the corresponding page of the Comm100 system. So how do you solve this problem?
Here we introduced the function of agent mapping, through the agent mapping page, we establish a mapping link between the agent of the Vincall system and the agent of Comm100, so that when you need to log in to Comm100, you can bind the agent corresponding to Comm100 and the agent of Vincall after the trust is established between the two sides. Let the agent of the Vincall system feel seamlessly connected to the Comm100 system in the user experience.
Users can view the mapping between the agents between the two systems in the Vincall user mapping page.
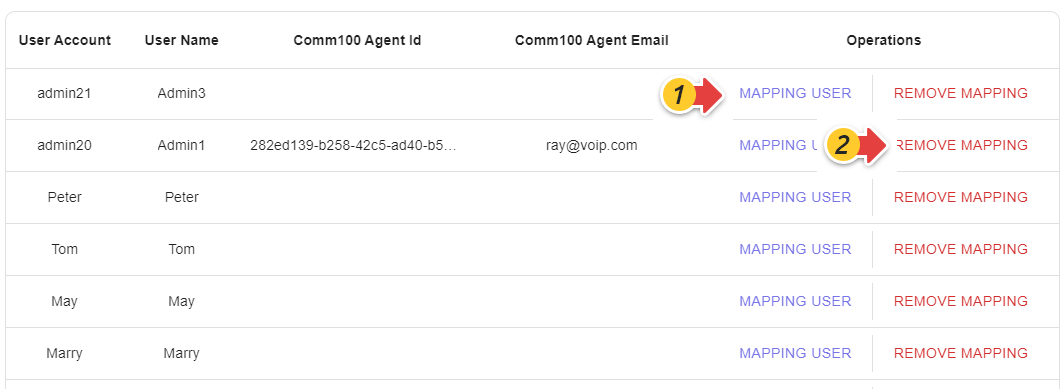
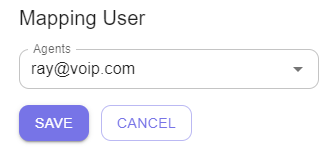
The user account and user name in the table headder are the user information of Vincall, and Comm100 agent id and email in the table headder are the agent information of Comm100, If the fields Comm100 agent id and email do not have values, it indicates that there is no mapping between the two systems. Click the button mapping user (Fig. 1), and set up the Comm100 agent that needs to be mapped.

Select the appropriate Comm100 agent, save it, and create a mapping.
Click the button removing user (Fig. 2), remove a mapping.
Step-by-Step Instructions
In the previous tutorial in this series, you have connected to Comm100 account via OAuth 2. In this tutorial, you'll design your front-end pages and back-end APIs to complete agent mapping. The tutorial covers the following tasks:
- Creating a New Page for Agent Mapping
- Accessing Comm100 Agents API
- Providing additional API for Agent Mapping
- Adding Agents List from Frontend
- Adding the Operation to Map Comm100 Agent
- Adding the Operation to Remove a Mapping
Creating a New Page for Agent Mapping
Let's build a ConnectList.tsx component to implement an agent mapping list, the interface is drawn using 'DataGrid'. The section helps us build a data grid with header.

Let's get started.
The sample code is in file ./src/Pages/Connect/ConnectList.tsx of vincall-portal project.
import {DataGrid,GridColumns} from '@mui/x-data-grid';
import Divider from '@mui/material/Divider';
import {useEffect,useMemo} from 'react';

export const ConnectList = ({}: ConnectListProps) =>
{
const columns: GridCollumns = useMemo(
 ()=>
[
 {
   field: "id",
   headerName: "ID",
   flex:1,
   sortable:false,
   headerAlign: "center",
   align:"center",
   hide:true,
 },
{
   field: "userAccount",
   headerName: "User Account",
   flex:1,
   sortable:false,
   headerAlign: "center",
   align:"center",
 },
{
   field: "userName",
   headerName: "User Name",
   flex:1,
   sortable:false,
   headerAlign: "center",
   align:"center",
 },
{
   field: "comm100AgentId",
   headerName: "Comm100 Agent Id",
   flex:2,
   sortable:false,
   headerAlign: "center",
   align:"center",
 },
{
   field: "comm100Email",
   headerName: "Comm100 Agent Email",
   flex:2,
   sortable:false,
   headerAlign: "center",
   align:"center",
 },
{
   field: "operations",
   headerName: "Operations",
   width:350,
   sortable:false,
   headerAlign: "center",
   align:"center",
 },
]
);

return (<DataGrid columns={columns} pageSize={10} rowsPerPageOptions={[10,20,30]} disableColumnMenu/>);
};
Accessing Comm100 Agents API
In the authorization in the previous section, we saved the access_token and refresh_token returned by the Oauth service of Comm100, with access_token you can access the agents restful interface of Comm100, if the accessed interface returns a 401 error, then you need to use the oauth service refresh_token to Comm100 to refresh the access_tokens and refresh_token.
In .NET core development, there are a lot of class libraries for accessing third-party APIs, and the 'WebApiClientCore' class library is used here, and in .NET core projects you can use the following command to increase the reference to the nuget package.
dotnet add package WebApiClientCore --version 2.0.2
Defines the entity classes that need to be used in the next API. The sample code is in file ./vincall.service/Models/TokenResult.cs,Comm100Agent.cs of vincall-service project.
public class TokenResult
{
   public string access_token {get; set;}
   public string refresh_token {get; set;}
   public string scope {get; set;}
}

public class Comm100Agent
{
   public Guid Id {get; set;}
   public string Email {get; set;}
   public string DisplayName {get; set;}
}
Defines the interface class for accessing Comm100 Oauth, the Oauth interface of Comm100 can be accessed directly through the interface class.The sample code is in file ./vincall.service/WebApiServices/IComm100OauthClient.cs of vincall-service project.
public interface IComm100OauthClient: IHttpApi
{
   [HttpPost("oauth/token")]
   ITask<TokenResult> QueryAccessTokenAsync([PathQuery]string siteId,[FormContent] string code, [FormContent] string client_id, [FormContent] string client_secret,[FormContent] string grant_type,[FormContent] string redirect_uri);

[HttpPost("oauth/token")]
   ITask<TokenResult> RefreshTokenAsync([PathQuery]string siteId,[FormContent] string code, [FormContent] string client_id, [FormContent] string client_secret,[FormContent] string grant_type,[FormContent] string refresh_token);

}
Defines the interface class for accessing Comm100 agents, the agents interface of Comm100 can be accessed directly through the interface class.The sample code is in file ./vincall.service/WebApiServices/IComm100OauthClient.cs of vincall-service project.
public interface IComm100ApiClient: IHttpApi
{
   [HttpGet("/api/global/agents")]
   ITask<List<Comm100Agent>> GetAgentsAsync([Header("Authorization")] string token, [PathQuery]int siteId);
}
Register the interface class in the Startup.cs service configuration method for use in next APIs,The sample code is in file ./vincall.service/startup.cs of vincall-service project.
services.AddHttpApi<IComm100OauthClient>();
services.AddHttpApi<IComm100ApiClient>();
Create API interface '/Comm100Agent/Agents?siteId=xxx',The sample code is in file ./vincall.service/Controller/Comm100AgentController.cs of vincall-service project.
[ApiController]
[Route("[controller]")]
public class Comm100AgentController: ControllerBase
{
   private IComm100OauthClient _comm100OauthClient;
   private IComm100ApiClient _comm100Client;
   private ICrudServices  _service;
   public Comm100AgentController(IComm100OauthClient comm100OauthClient, IComm100ApiClient comm100Client, ICrudServices service)
   {
      this._comm100OauthClient = comm100OauthClient;
      this._comm100Client = comm100Client;
      this._service = service;
   }

   [Authorize]
   [HttpGet("Agents")]
   public async Task<IActionResult> QueryAgentAsync([FromQuery] int siteId)
   {
      var tokenResult = _service.ReadMany<Comm100Token>(x=>x.siteId = siteId).FirstOrDefaultAsync();
      if (tokenResult == null)
      {
           return Ok(new List<Comm100Agent>());
      }
      try{
         var list = await _comm100Client.GetAgentASync("Bearer"+ tokenResult.access_token, siteId);
         return Ok(list);
      }
      catch (HttpRequestException ex)
      {
         var innerEx = (ex.InnerException as ApiResponseStatusException);
         if(innerEx?.StatusCode == HttpStatusCode.Unauthorized)
         {
            //refresh token
            var result = await RefreshTokenAsync(siteId,refreshToken);
            if (result == null)
            {
               return Unauthorized();
            }
            await _service.SaveToken(siteId,result.access_token,result.refresh_token);
            var list = await _comm100Client.GetAgentASync("Bearer"+ result.access_token, siteId);
            return Ok(list);
         }
         throw;
      }
   }

   private async Task<TokenResult> RefreshTokenAsync(int siteId, string refreshToken)
   {
       var oauthInfo = await _service.GetAsync("vincallConnect");
       var tokenResult = await _comm100OauthClient.RefreshTokenAsync(siteId, oauthInfo.client_id, oauthInfo.client_secret, "refresh_token", refresh_token);
       return tokenResult;
   }
}
Providing additional API for Agent Mapping
To complete the mapping function, we need to query the user interface and the mapping interface, and submit the mapping modification when the user adds or deletes the mapping.
API for querying the agent list
Next is the interface that implements the query Vincall agent, which is used to provide data for the display of the front end.The sample code is in file ./vincall.service/Controller/UserController.cs of vincall-service project.
public async Task<UserResult> QueryUserAsync(int pageSize=0, int pageNum=0)
{
   var result = new UserResult();
   var users = _services.ReadManyNoTracked<User>();
   result.Count = user.Count();
   users = users.Page<User>(pageNum,pageSize);
   result.Users = _mapper.Map<List<UserDto>>(users.ToList());
   return result;
}
API for querying the mapping list
The table of the mapping between agents is:
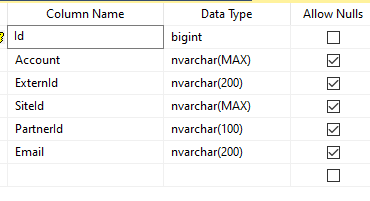
- SiteId: Comm100's site ID
- PartnerId: Comm100's partner ID
- Email: Comm100's agent email
- ExternId: Comm100's agent ID
- Account: Vincall's user account
The interface returns the mapping between agents, which is used to provide data for the display of the front end.The sample code is in file ./vincall.service/Controller/UserController.cs of vincall-service project.
public async Task<IEnumerable<UserMappingDto>> QueryUserAsync([FromQuery]int siteId)
{
   var result = new UserResult();
   var mappings= await _services.ReadManyNoTracked<UserComm100>(x=>x.SiteId == siteId).ToListAsync();
   var users = await _services.ReadManyNoTracked<User>().ToListAsync();;
   return mappings.Select(x=>new UserMappingDto{
      Comm100AgentId = x.ExternId,
      Comm100Email = x.Email,
      UserAccount = x.Account,
      UserName = users.FirstOrDefault(o=>o.Account.Equals(x.UserAccount, StringComparson.InvariantCultureIgnoreCase))?.UserName
   });
}
API for updating mapping list
When the user modifies the mapping, we need to save the mapping.The sample code is in file ./vincall.service/Controller/UserController.cs of vincall-service project.
public async Task<IEnumerable<UserMappingDto>> UpdateUserMapping([FromQuery]int siteId,[FromBody]List<UserMappingDto> mappings)
{
   var sources = _mapper.Map<List<UserComm100>>(mappings?.ToList());
   sources = sources?.Select(x=>{
      x.SiteId = siteId;
      return x;
   }).ToList();
   var userComm100es = await _services.DeleteAllThenInsertAndSaveAsync(sources);
   var result = _mapper.Map<List<UserMappingDto>>(userComm100es?.ToList());
   var users = await _services.ReadManyNoTracked<User>().ToListAsync();;
   result  = result .Select(x=>
      x.UserName = users.FirstOrDefault(o=>o.Account.Equals(x.UserAccount, StringComparson.InvariantCultureIgnoreCase))?.UserName;
      return x;
   }).ToList();
   return result;
}
Adding Agents List from Frontend
- Create a 'connectListApp' component to get the data returned by the API.
The sample code is in file ./src/Pages/Connect/ConnectList.tsx of vincall-portal project.
export const connectListApp = ({}:ConnectListAppProps): ConnectListApp => {
const [mapping,setMapping] = useState<MappingData[] | undefined>(undefined);
const handleLoad= ()={
   customHttpClient( `/usermapping/${localStorage.getItem('connectSiteId')}`,
   {
     method:'GET',
    }
}.then(res=>{
   const mappingUserList: MappingData[] = userList.map((user:any,index:number) =>{
      return {
         id:index,
         userAccount: user.account,
         userName: user.userName,
         comm100AgentId: '',
         comm100Email: '',
      }
   });
   for ( const userData of mappingUserList) {
       for(const mappingInfo of res.json) {
          if(userData.userAccount == mappingInfo.userAccount) {
            userData['comm100AgentId'] = mappingInfo['comm100AgentId'];
            userData['comm100Email'] = mappingInfo['comm100Email'];
         }
       }
   }
   setMapping(mappingUserList);
});
return {
  handleLoad,
};
};
- Modify the page
ConnectList.tsxand reference the components above
import {DataGrid,GridColumns} from '@mui/x-data-grid';
import Divider from '@mui/material/Divider';
import {useEffect,useMemo} from 'react';
export const ConnectList = ({}: ConnectListProps) =>
{
const {mapping,handleLoad} = connectListApp({});
...
const columns: GridCollumns = useMemo(
 ()=>
[
 ...
{
   field: "operations",
   headerName: "Operations",
   width:350,
   sortable:false,
   headerAlign: "center",
   align:"center",
 },
],[mapping]
);
return (<DataGrid columns={columns} pageSize={10} rowsPerPageOptions={[10,20,30]} disableColumnMenu/>);
};
- The final result is as follows:

Adding the Operation to Map Comm100 Agent
In the file ConnectList.tsx(The sample code is in file ./src/Pages/Connect/ConnectList.tsx of vincall-portal project.), add a MAPPING USER button to implement a pop-up Comm100 Agent so that users can modify the mapping:
import {MappingUserButton } from './Operations/MapppingUserButton';

const columns: GridCollumns = useMemo(
 ()=>
[
 ...
{
   field: "operations",
   headerName: "Operations",
   width:350,
   sortable:false,
   headerAlign: "center",
   align:"center",
   renderCell: (params) => {
     return (
       <div style={{
           display:"flex",
           justifyContent:"space-evenly",
           width:"100%"
         }}>
        <MappingUserButton
           row={params.row}
           allData={mapping}
           onRefresh={handleRefresh}
         />
       </div>
     );
   }
 },
],[mapping]
);
The revised page is as follows:

Adding the Operation to Remove a Mapping
In the file ConnectList.tsx(The sample code is in file ./src/Pages/Connect/ConnectList.tsx of vincall-portal project.), add the code related to the button REMOVE MAPPING to remove the mapping so that the user can remove the mapping:
import {RemoveMappingButton} from './Operations/RemoveMappingButton';

const columns: GridCollumns = useMemo(
 ()=>
[
 ...
{
   field: "operations",
   headerName: "Operations",
   width:350,
   sortable:false,
   headerAlign: "center",
   align:"center",
   renderCell: (params) => {
     return (
       <div style={{
           display:"flex",
           justifyContent:"space-evenly",
           width:"100%"
         }}>
        <MappingUserButton
           row={params.row}
           allData={mapping}
           onRefresh={handleRefresh}
         />
        <Divider orientation="vertical" flexItem />
        <RemoveMappingButton
           row={params.row}
           allData={mapping}
           onRefresh={handleRefresh}
         />
       </div>
     );
   }
 },
],[mapping]
);
The revised page is as follows:

Next Steps
This article has taught you how to call the Comm100 API to implement the Agent mapping, and after setting up the mapping of agents, you can access the Comm100 page, suce as adding Comm100 Chat to Vincall. For more details, see Part 4: Embedding Live Chat Agent Console.