- 20 Jun 2022
- 5 Minutes to read
- Print
- DarkLight
Part 3: Connecting with Vincall Account
- Updated on 20 Jun 2022
- 5 Minutes to read
- Print
- DarkLight
Introduction
To enable the Comm100 agent users to map smoothly to the Vincall accounts and present the site to the final agent user, we need to establish a connection between the Vincall app and Comm100 through OAuth 2. Once the connection is established, the Vincall agent information can be accessed based on OAuth 2 authorization, and the agent between the two sites can be further mapped.
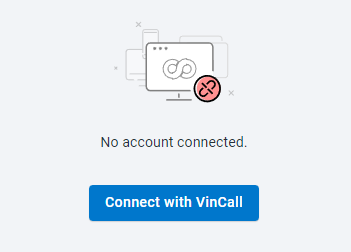
When entering the connect Vincall interface, if it is detected that it has not been authorized, the page that requires the user to establish a connection is displayed, and the effect of the page is as follows:

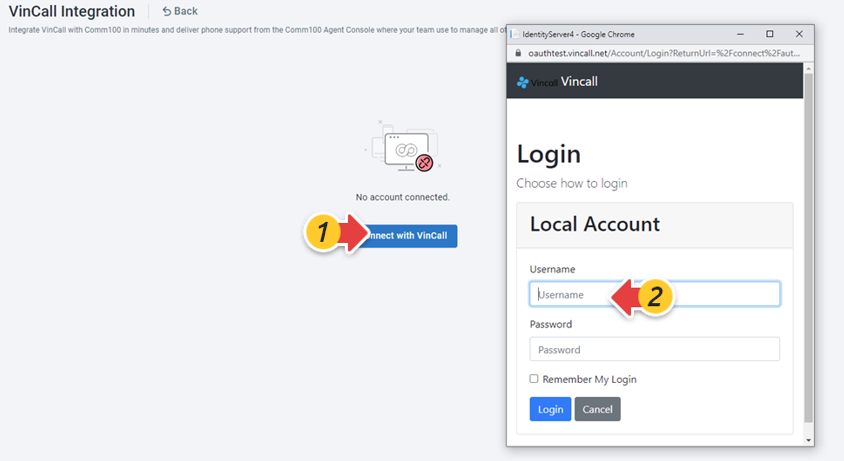
The illustration indicates that the user is not connected to Vincall, and if a connection is required, they can click the Connect with VinCall button to enter Vincall OAuth's authorization process interface.

After entering the Vincall account, the authorization is performed, and the pop-up window will be automatically closed after successful login, and then refresh the connection page, which is displayed as follows refreshing the page.

Step-by-Step Instructions
In the previous tutorial in this series, you've done the authentication aspect. In this tutorial, you'll design your front-end pages and back-end APIs to complete connecting Vincall via OAuth 2. The tutorial covers the following tasks:
- Preparing Vincall OAuth 2 Credentials
- Creating APIs for Querying or Saving State of Connection
- Displaying the Connection State Page
- Connecting to Vincall for Getting Authorization
- Refreshing the Connection State Page
Preparing Vincall OAuth 2 Credentials
The Vincall OAuth 2 service (In the vincall-oauth project) can rely on the database to initialize a client credentials, and add the following code in config.cs file (./Models/Config.cs):
new Client
{
   ClientId = "vincall",
   ClientName ="Vincall",
   ClientSecrets = {new Secret("123456".Sha256)},
   RequirePkcs = false,
   AllowdGrantTypes = GrantType.CodeAndClientCredentials,
   AllowOfflineAccess = true,
   RedirectUris = {"https://api.vincall.net/open/login/callback"},
}
Then after this step, run the VincallService project again and set the parameter 'InitDB' in Appsetting.json to true, initialize the database, and insert an OAuth 2 credential with the client_id as 'vincall', the client_secret as '123456', and the redirect_uri as https://api.vincall.net/open/login/callback.
Creating APIs for Querying or Saving State of Connection
Design the ConnectState entity as a place to store the Connect Vincall, and its table structure is as follows:

Add API related to ConnectState entities, including querying and modifying interfaces.
The sample code is in file ./vincallIntegration.Service/Controllers/ConnectStateController.cs of vincall-integration project.
- Query the ConnectState entity interface
This interface returns the connection status to Comm100 specified siteid.
public async Task<ConnectionStateDto> Get(int siteId)
{
     var connectionState = await _services.ReadSingleAsync<ConnectionState>(item=>item.SiteId==siteId);

     var result = _mapper.Map<ConnectionStateDto>(connectionState);

     return await result;
}
- Set up the ConnectState entity interface
This interface updates the connection status to Comm100 specified siteid.
public async Task<ConnectionStateDto> Set(int siteId)
{
    var connectionState = await _services.ReadSingleAsync<ConnectionState>(item => item.SiteId == siteId);

    if (connectionState != null)
    {
        connectionState.Connected = false;

        await _services.UpdateAndSaveAsync<ConnectionState>(connectionState);
    }

    var connectionStateNew = await _services.ReadSingleAsync<ConnectionState>(item => item.SiteId == siteId);

    var result = _mapper.Map<ConnectionStateDto>(connectionStateNew);

    return await result;
}
Displaying the Connection State Page
Create a SettingsPage.tsx page component to draw the connection page. This page is used to show if Comm100 has established a connection with Vincall.
The sample code is in file ./src/Pages/integration/SettingsPage.tsx of vincall-app project.
return (
    <CPage
      id="settingsPage"
      title="VinCall Integration"
      description="Integrate VinCall with Comm100 in minutes and deliver phone support from the Comm100 Agent Console where your team use to manage all other channels."
      onClickGoBack={clickGoBackHandle}
    >
      <PageContextProvider
        value={{
          disconnectCallback: () => {
            setConnectStatus("unconnected");
          }
        }}
      >
        {connectStatus === "connecting" && <CFormSkeleton />}
        {connectStatus === "unconnected" && (
          <>
            {isIntegrating && (
              <CVincallConnectContainerStyled>
                <CCircularProgressStyled size={50} />
              </CVincallConnectContainerStyled>
            )}
            {!isIntegrating && <CUnConnected onClick={clickConnectHandle} />}
          </>
        )}
        {connectStatus === "connected" &&
          connectData && (
            <CIntegrationForm connect={connectData}>
              <CFormContent />
            </CIntegrationForm>
          )}
      </PageContextProvider>
    </CPage>
  );
Connecting to Vincall for Getting Authorization
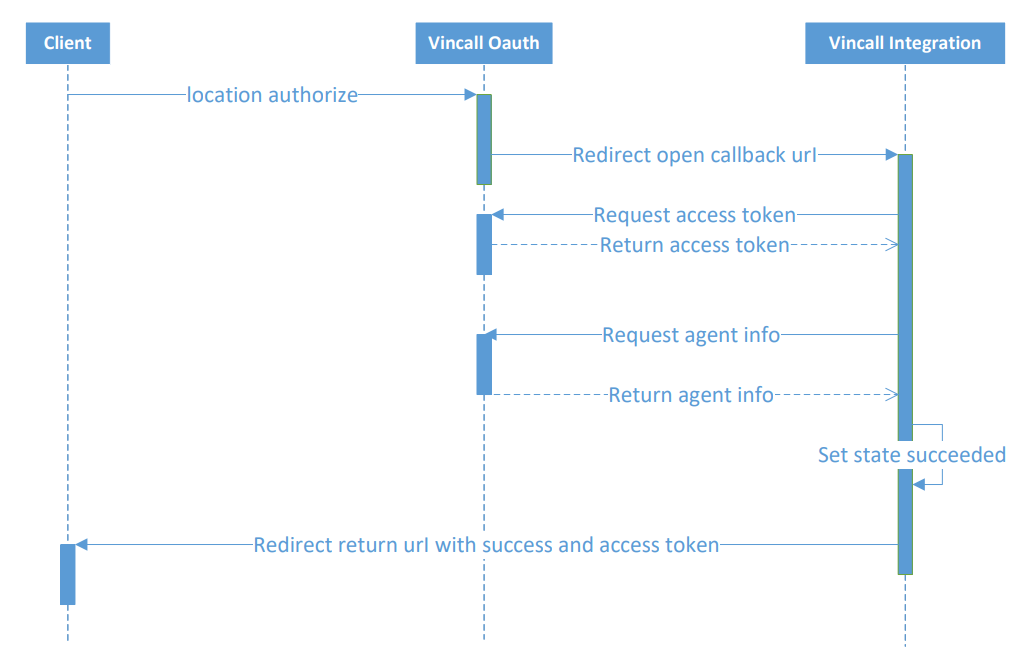
When connected to Vincall, it needs to establish a request and obtain authorization with Vincall OAuth 2. The main process for connecting Vincall is as follows:

The front-end page builds the clickConnectHandle function, and the code is as follows:
The sample code is in file ./src/Pages/integration/SettingsPage.tsx of vincall-app project.
const clickConnectHandle = (event: MouseEvent) => {
    const currentHref = window.location.href.substring(
      0,
      window.location.href.indexOf("?")
    );
    const callbackHref = currentHref.replace(
      /\/([^\/]*)\.html/gi,
      "/vincallCallback.html"
    );
    handleRef.current = delayOpenWindow(
      async () => {
        return [
          `${oauthDomain}/connect/authorize`,
          "?client_id=vincall",
          "&response_type=code",
          "&scope=api",
          `&redirect_uri=${encodeURIComponent(
            `${apiDomain}/open/login/callback?redirect_uri=${encodeURIComponent(
              callbackHref
            )}&siteId=${getSiteId()}&domain=${oauthDomain}`
          )}`
        ].join("");
      },
      "connect",
      {
        width: 480,
        height: 600,
        top: 100,
        left: 100
      }
    );
  };
When the Vincall authorization is completed, the callback interface will be called back, and if the authorization authentication is true in this interface, the connection status needs to be set to true.
The sample code is in file ./vincallIntegration.Service/Controllers/LoginController.cs of vincall-integration project.
public async Task<IActionResult> CallbackAsync([FromQuery]VincallCallModel model)
{
    var errMsg = string.Empty;
    var oauthInfo = await _settingService.GetAsync("vincall");
    if (string.IsNullOrEmpty(oauthInfo?.client_id))
    {
        return new BadRequestResult();
    }

    if (string.IsNullOrEmpty(model?.Code))
    {
        errMsg = "invalid authorizatoin code";
    }
    else
    {
        try
        {
            var queryString = HttpContext.Request.QueryString.Value;
            var originalUrl = queryString.Substring(0, queryString.IndexOf("&code="));
            _hostProvider.Host = model.Domain;
            var info = await GetTokenAsync(model.Code, originalUrl);

            await UpdateConnectionAsync(model.SiteId);


            var uriRedirect = SSoController.BuildUrl(model.redirect_uri, new Dictionary<string, StringValues> {
                {"code",info }
            });

            _logger.LogInformation("access_token----->" + info);
            return Redirect(uriRedirect.ToString());
        }
        catch (Exception ex)
        {
            errMsg = $"vincall oauth code :{model.Code},{ex.Message}";
            _logger.LogError(ex, $"vincall oauth code :{model.Code},{ex.Message}");
        }
    }

    var uri = SSoController.BuildUrl(oauthInfo.redirect_uri, new Dictionary<string, StringValues> {
                    {"success","false" },
                    {"errMsg", errMsg },
                });
    return Redirect(uri?.ToString());
}
Refreshing the Connection State Page
When the previous step is completed, the page will be redirected, here we set it to 'vincallCallback.html', in this page we only need 'postMessage' to notify the connection page to refresh.
The sample code is in file ./src/assets/vincallCallback.html of vincall-app project.
var code = getQueryString("code");
window.opener.postMessage({code: code});
Listen for messages on the Vincall connection page and trigger an update status.
The sample code is in file ./src/Pages/integration/SettingsPage.tsx of vincall-app project.
window.addEventListener("message", handleMessage);

const handleMessage = async (event: any) => {
    const { code } = event.data;
    const pathname = event.source.location.pathname;

    if (pathname.toLowerCase().indexOf("vincallcallback.html") >= 0 && code) {
      setIsIntegrating(true);

      handleRef.current.then(h => h.close());

      handleLoadConnectState();
    }
  };
Next Steps
In this tutorial, you learned how to implement the connection to Vincall, and when you have done this, you can do further operations, according to the access token of the Vincall obtained, to access the agents of the Vincall, and set the mapping between the agents of the two systems. For more details, you can refer to the Mapping the Agents.

