- 20 Jun 2022
- 5 Minutes to read
- Print
- DarkLight
Part 2: Setting up the App
- Updated on 20 Jun 2022
- 5 Minutes to read
- Print
- DarkLight
Introduction
Third-party developers can extend the functionality of Comm100 through the Comm100 app. Vincall as a third-party system, can also extend the Comm100 through the app. Adding the VoIP functionality of Vincall into Comm100.
In this Tutorial we will cover how to add an app to Comm100 and then extend the functionality by frontend pages. Also we will create a backend service to provide API for the Settings page and add authentication for the Vincall app.
After completing this tutorial, we will see an app called Vincall Integration in the private app, and clicking on Settings' Button will take you to the app's settings page.
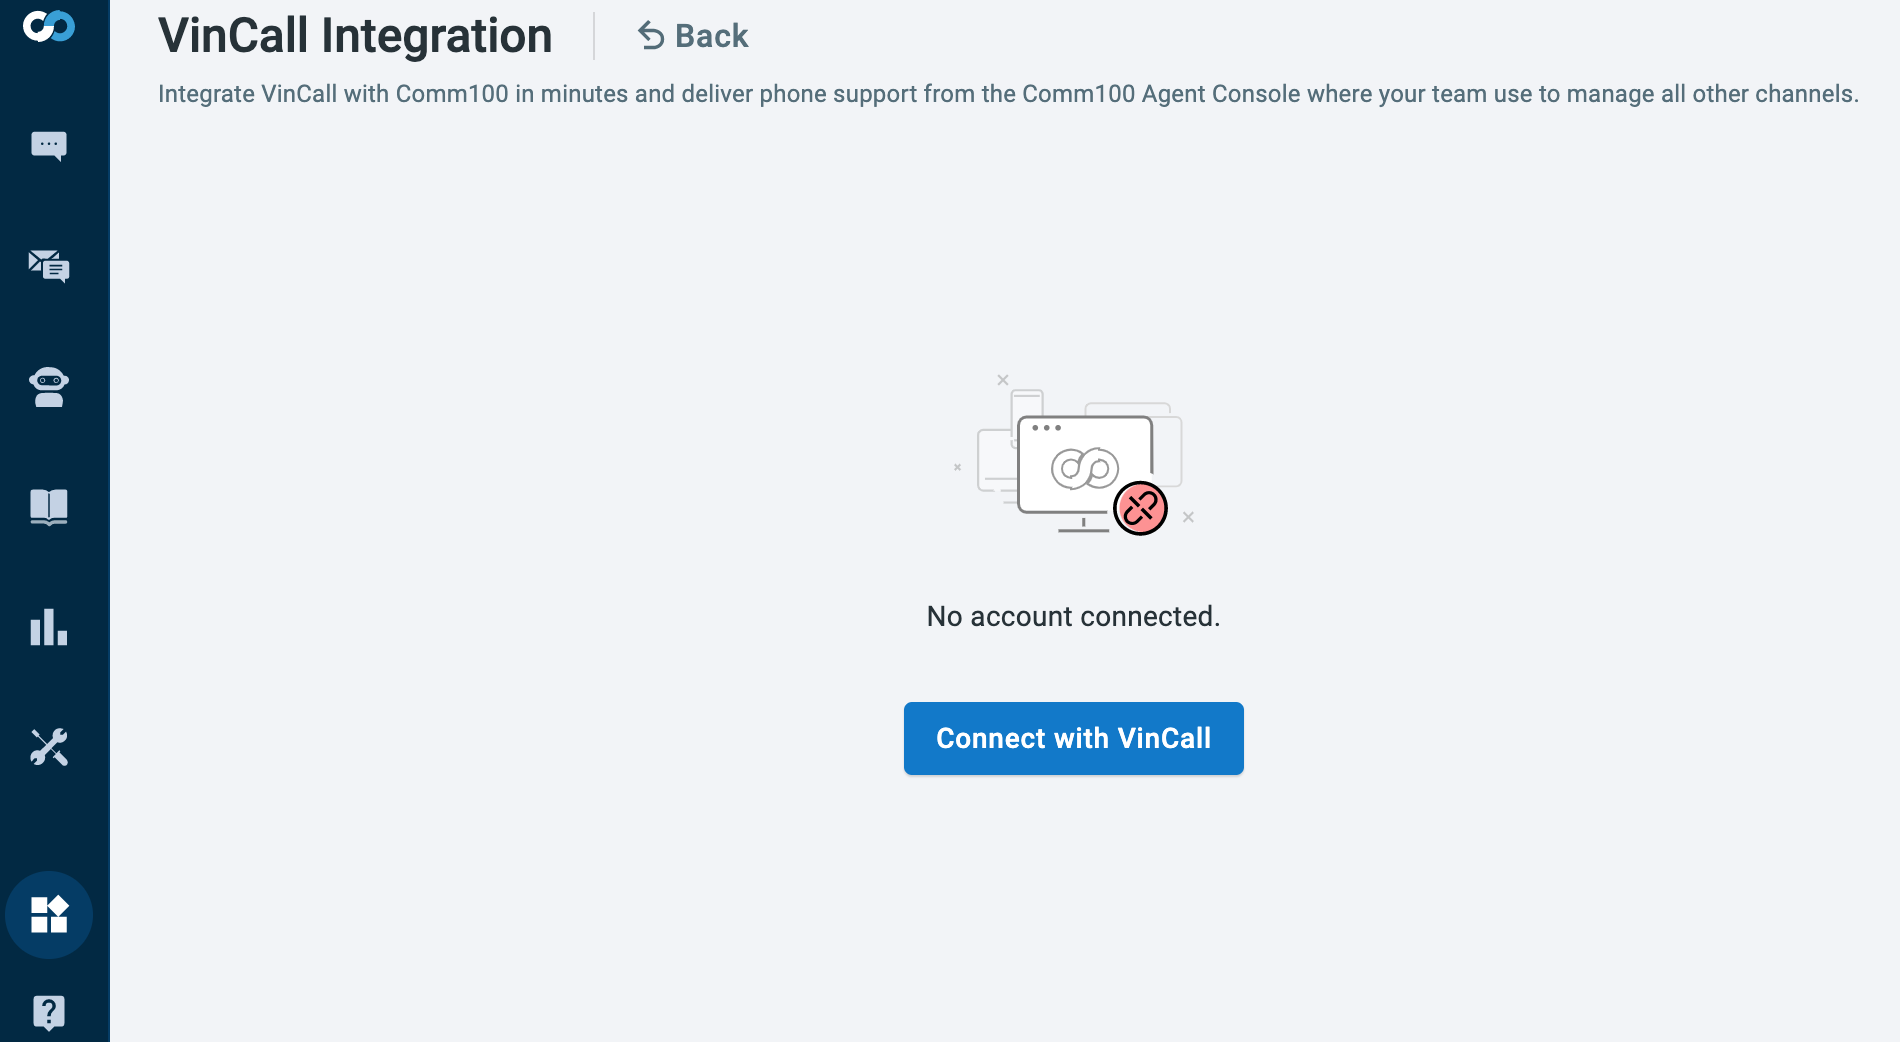
Step-by-Step Instructions
- Creating an App in Comm100
- Adding Settings Page
- Creating Comm100 OAuth Client
- Authenticating with Comm100 Agent via OAuth 2
Creating an App in Comm100
All of the Vincall features added into Comm100 are based on Comm100 app. So let's create an app in the Comm100 account.
Open a browser and log in to your Comm100 account using your Comm100 credentials (email and password). Go to Apps & Integrations page and click Create or manage your own apps link to create own own app.
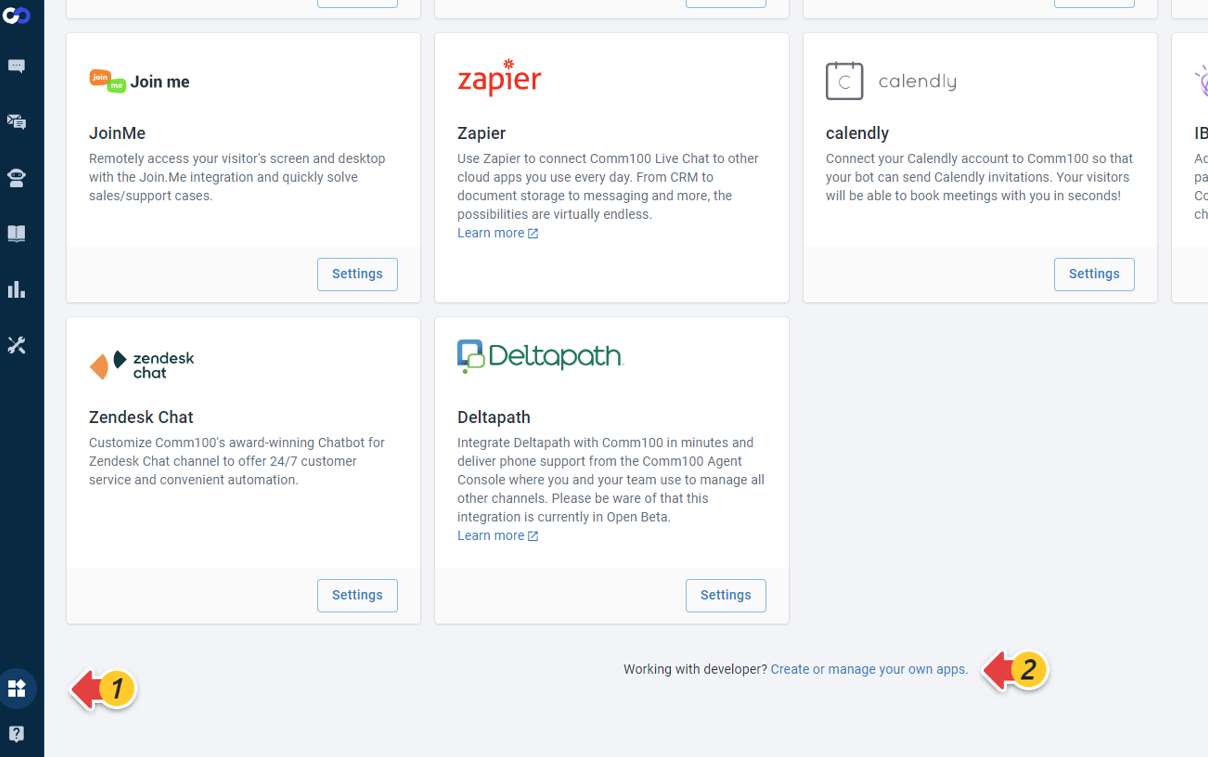
Click the Add App button and fill in the following information:
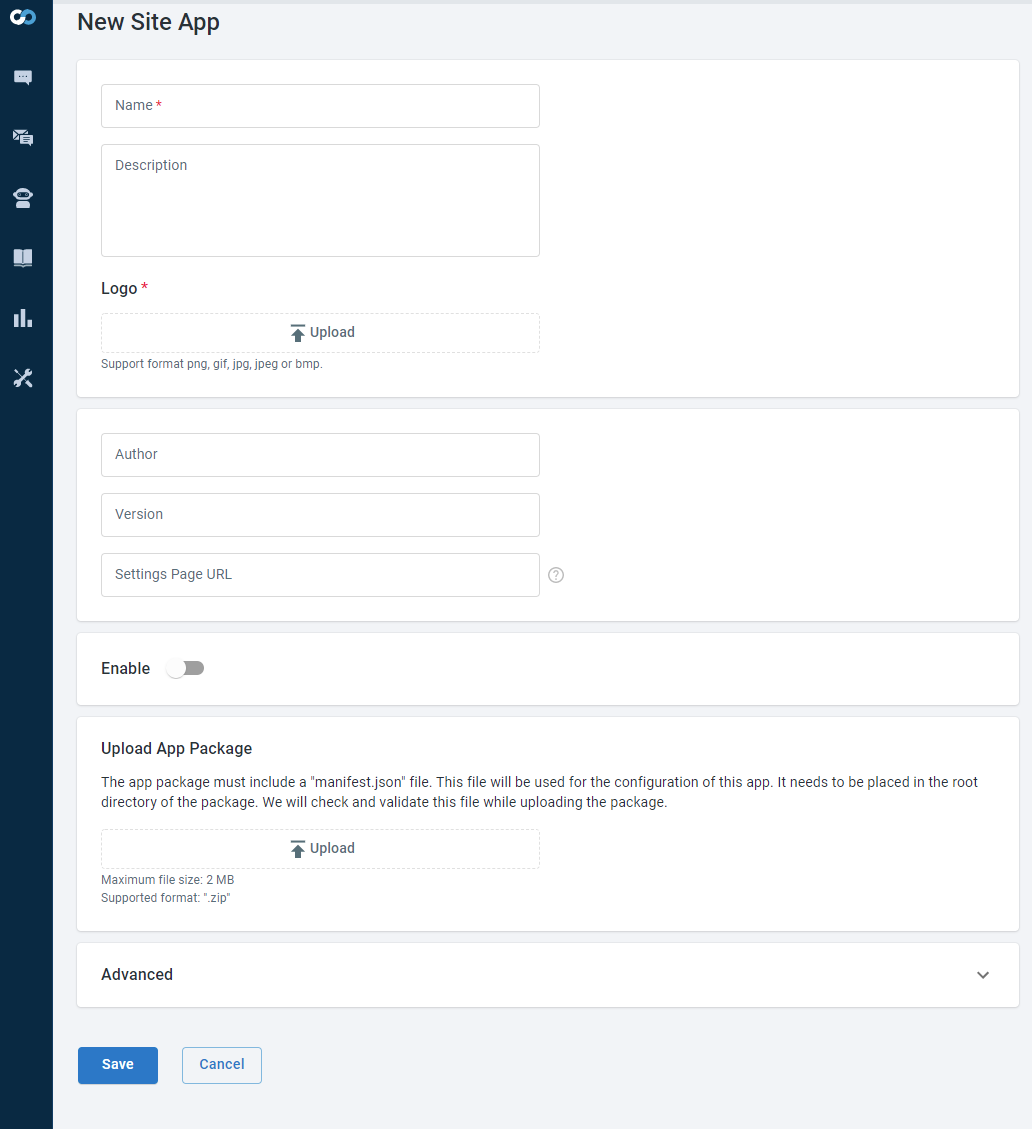
- Name:
Vincall - Description:
You can use Vincall to enable the phone channel. We allow Agent to use Vincall directly in the Agent Console to answer calls or call users directly. - Logo:

- Settings Page URL:
./integraiton.html - Enable:
true
For more instructions on these configurations, please refer to App Properties.
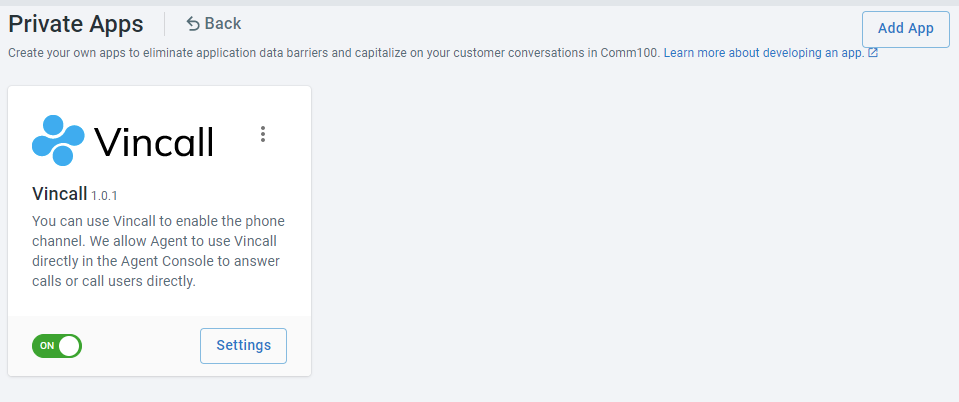
- Click the save button will return to the list page. You can see such an app in this page.
Adding Settings Page
In the previous step, we specified the settings page as ./integration.html. We need to create the page in our frontend project vincall-app.
- Create a template html index.html file (src/pages/integration/index.html) for integration page.
<!DOCTYPE html>
<html>
  <head>
    <title>VinCall Integration</title>
  </head>
  <body>
    <div id="main"></div>
  </body>
</html>
- Create a main.tsx file (src/pages/integraiton/main.tsx) to render the
component into the div container with the id main.
const App = () => {
  return (
    <CProviders>
      <Authentication />
    </CProviders>
  );
};

render(<App />, document.getElementById("main"));
- Add
Authenticationcomponent in Login.tsx file (src/pages/integraiton/Login.tsx).
export const Authentication = () => {
  const [accessToken, setAccessToken] = useState("");
  const currentHref = window.location.href.substring(
    0,
    window.location.href.indexOf("?")
  );
  const getAccessTokenHref = currentHref.replace(
    /\/([^\/]*)\.html/gi,
    "/getAccessToken.html"
  );
  const handleMessage = async (event: any) => {
    const { code } = event.data;
    const pathname = event.source.location.pathname;

    if (pathname.toLowerCase().indexOf("getaccesstoken.html") >= 0 && code) {
      setSessionStorageAccessToken(code);
      setAccessToken(code);
    }
  };
  useEffect(() => {
    window.addEventListener("message", handleMessage);
    return () => window.removeEventListener("message", handleMessage);
  });
  return (
    <>
      <iframe
        src={`${apiDomain}/open/login/?agentId=${getAgentId()}&siteId=${getSiteId()}&domain=${encodeURIComponent(
          `${window.location.protocol}//${window.location.host}`
        )}&returnUri=${encodeURIComponent(getAccessTokenHref)}`}
        style={{ display: "none" }}
      />
      {accessToken && <SettingsPage />}
    </>
  );
};
- Add the getAccessToken.html page (src/assets/getAccessToken.html) that receives the access token.
<!DOCTYPE html>
<html lang="en">

<head>
  <meta charset="UTF-8" />
  <meta name="viewport" content="width=device-width, initial-scale=1.0" />
  <meta http-equiv="X-UA-Compatible" content="ie=edge" />
  <title>Document</title>
</head>
<script>
  function getQueryString(name) {
    var reg = new RegExp("(^|&)" + name + "=([^&]*)(&|$)", "i");
    var r = window.location.search.substr(1).match(reg);
    if (r != null) return unescape(r[2]);
    return null;
  }
  var accessToken = getQueryString("code");
  window.parent.postMessage({ code: accessToken });

</script>

<body></body>

</html>
- Using webpack (webpack.config.js) to build an
integration.html
const config = merge(base, {
  entry: {
    integration: './src/pages/integration/main.tsx',
  },
  mode: 'development',
  output: {
    path: path.resolve(__dirname, 'dist'),
    filename: `[name]_bundle.js`
  },
  plugins: [
    new HtmlWebpackPlugin({
      filename: 'integration.html',
      template: './src/pages/integration/index.html',
      chunks: ['integration']
    }),
  ],
  resolve: {
    alias: {
      src: getPath('./src')
    }
  },
});

module.exports = () => {
  return config;
};
Creating Comm100 OAuth Client
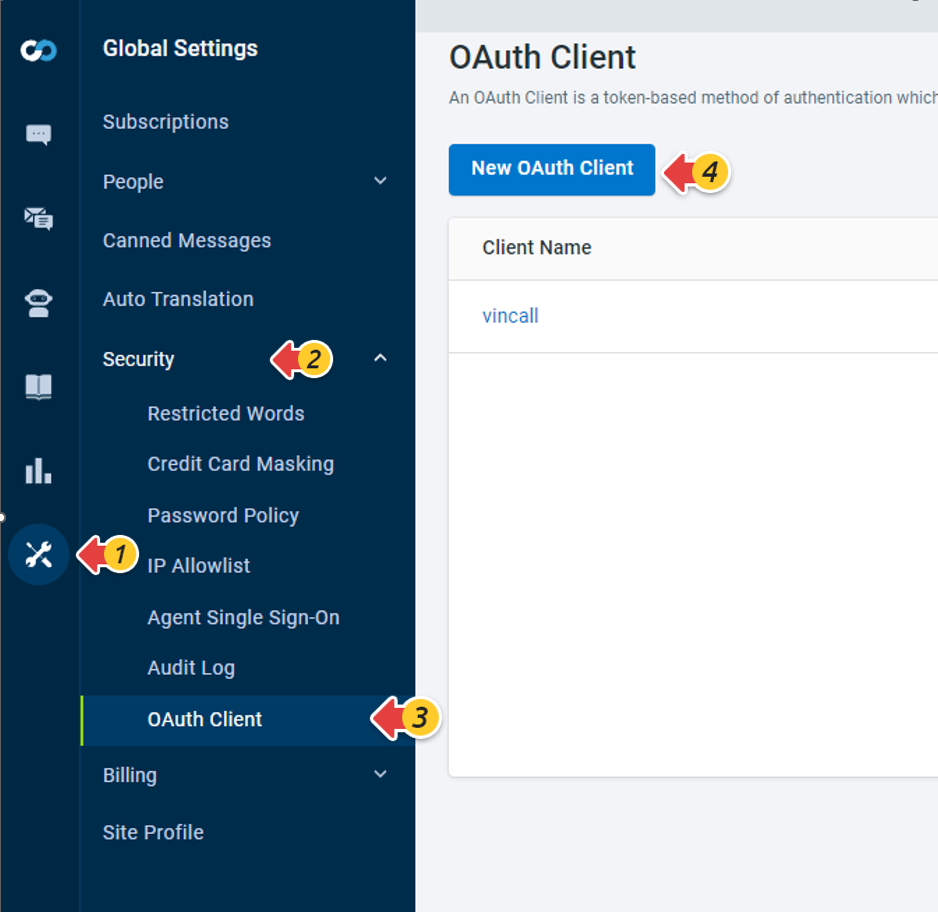
Navigate to Global Settings >> Security >> Oauth Client and create a new OAuth 2 Client on the page.
Enter the following required information, where the clientId is a user-defined string and the redirect_uri is the callback interface address defined by OAuth 2.
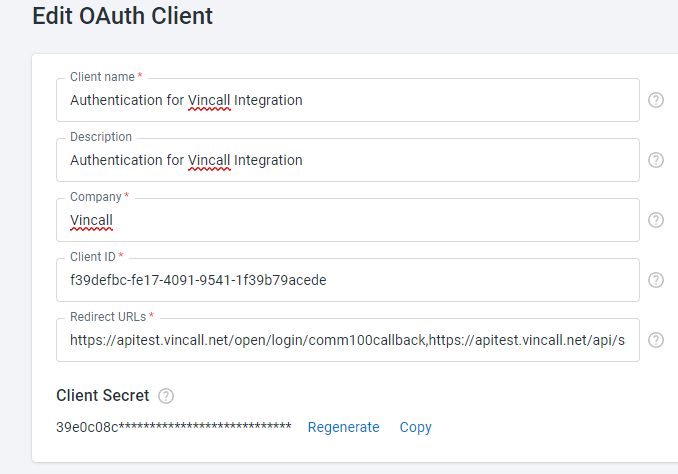
Store ClientId and ClientSecrect in the database, and add parameters such as grant_type, redirect, redirect_logon, and domain (which will be used later)

grant_type is the authorization_code which represents authorization code pattern redirect_uri is the address of the callback interface of OAuth defined in vincall, the address of the vincall backend callback service interface, which is https://api.vincall.net/open/login/comm100callback
Authenticating with Comm100 Agent via OAuth 2
To get access to the resources of Vincall, we need to verify that our request is from Comm100, and if the verification is successful, then we can authorize it.
According to the OAuth 2 authorization of Comm100, the agent of Comm100 is issued an access token. Its main process is as follows:
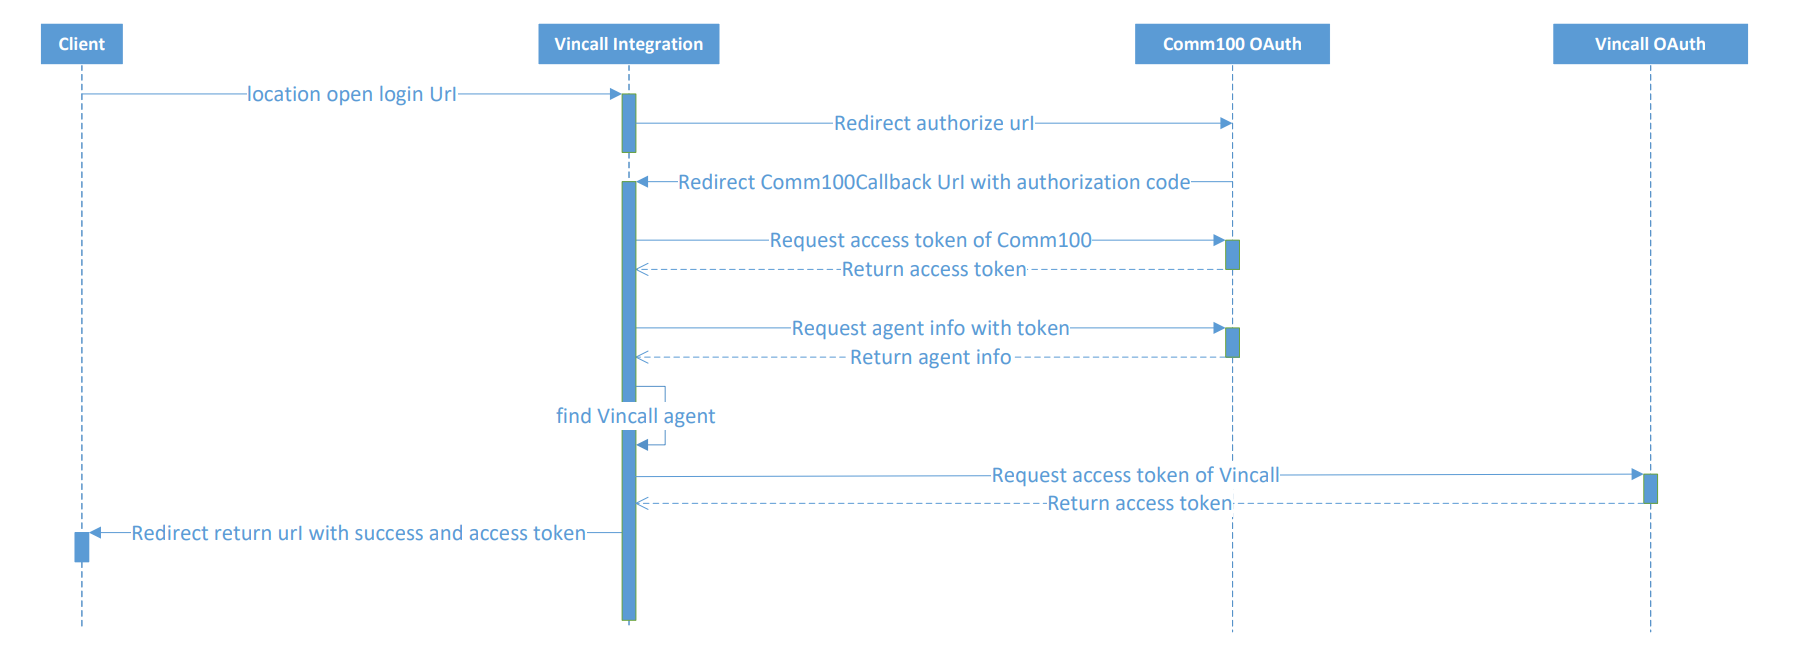
As described in the flowchart above, we need to implement the interface for initiating OAuth 2 requests (Open/login) and handling authorization callbacks(Open/comm100callback) in vincall-integration.
Open/login API
Add a Open/login interface (VincallIntegration.Service/VincallIntegration.Service/Controllers/LoginController.cs) to request for initiating Comm100 OAuth 2 requests.
public async Task<IActionResult> LoginAsync([FromQuery]LoginModel model)
{
    if (string.IsNullOrEmpty(model?.Domain))
    {
        return new BadRequestResult();
    }
    var oauthInfo = await _settingService.GetAsync("connect");
    if (string.IsNullOrEmpty(oauthInfo?.client_id))
    {
        return new BadRequestResult();
    }

    var redirectUri = oauthInfo.redirect_uri.BuildUrl(
        new Dictionary<string, StringValues> {
                    {"siteid",model.SiteId },
                    {"domain", model.Domain },
                    {"agentId", model.AgentId },
                    {"returnUri", model.returnUri },
                }
        );

    var comm100OauthUri = $"{model.Domain}/oauth/authorize".BuildUrl(
        new Dictionary<string, StringValues> {
                    {"client_id",oauthInfo.client_id },
                    {"response_type", "code" },
                    {"siteid", model.SiteId },
                    {"scope", "openid offline_access"},
                    {"redirect_uri", redirectUri.ToString() },
                }
        );
    _logger.LogInformation($"redirect oauth: {comm100OauthUri.ToString()}");
    return Redirect(comm100OauthUri.ToString());
}
Open/comm100callback
Add a Open/comm100callback interface (VincallIntegration.Service/VincallIntegration.Service/Controllers/LoginController.cs), and the interface is used by the Comm100 OAuth 2 redirect to verify the legitimacy of the Comm100 account.
try
{
    var queryString = HttpContext.Request.QueryString.Value;
    var originalUrl = queryString.Substring(0, queryString.IndexOf("&code="));
    _hostProvider.Host = model.Domain;
    var info = await GetComm100TokenAsync(model.Code, model.SiteId, originalUrl);
    if (string.IsNullOrEmpty(info?.SiteId) || string.IsNullOrEmpty(info?.AgentId))
    {
        throw new UnauthorizedAccessException("comm100 oauth user info");
    }
    // ok, get vincall access-token
    _hostProvider.Host = _Configuration["OauthUri"];
    var vincallToken = await _vincallClient.GetVincallTokenAsync();
    var uriRedirect = model.returnUri.BuildUrl(
        new Dictionary<string, StringValues> {
        {"code",vincallToken.access_token },
        {"success","true" },
    });
    return Redirect(uriRedirect.ToString());
}
catch (Exception ex)
{
    errMsg = $"comm100 oauth code :{model.Code},{ex.Message}";
    _logger.LogError(ex, $"comm100 oauth code :{model.Code},{ex.Message}");
}
The variable _Configuration["OauthUri"] comes from the file appsettings.json (VincallIntegration.Service/VincallIntegration.Service/appsettings.json), and it is the Vincall OAuth2's url.
"OauthUri": "https://oauth.vincall.net",
Next Steps
In this tutorial, you learned how to set up an app and authenticate with Comm100 Agent via OAuth 2. Then we can establish a connection between the Vincall app and Comm100 through OAuth 2. For more details, you can refer to the Connecting with Vincall Account.

